Carregar apresentação
A apresentação está carregando. Por favor, espere

1
A PRÉ-HISTÓRIA Custom animation effects: horizontal scrolling text
(Basic) To reproduce the text effects on this slide, do the following: On the Home tab, in the Slides group, click Layout, and then click Blank. On the Insert tab, in the Text group, click Text Box, and then on the slide, drag to draw the text box. Enter text in the text box. (Note: You may want to add a bullet point at the end of your text, as in the example above. On the Insert tab, in the Text group, click Symbol. In the Symbol dialog box, in the Font list, select (normal text). In the Subset list, select General Punctuation. In the Character Code box, enter 2022 to select BULLET, and then click Insert.) Select the text. On the Home tab, in the Font group, do the following: In the Font list, select Gill Sans MT. In the Font Size list, select 36. Click Bold. Click the arrow next to Font Color, and then under Theme Colors click White, Background 1 (first row, first option from the left). On the Home tab, in the Paragraph group, click Align Text Left to align the text left in the text box. (Note: If the text wraps to more than one line, drag the adjustment handles on the text box to widen it until the text fits on one line.) Drag the text box to the left of the lower left edge of the slide. (Note: To see beyond the edges of the slide, on the View tab, click Zoom, and then in the Zoom dialog box, in the Percent box, enter 40%.) To reproduce the animation effects on this slide, do the following: On the Animations tab, in the Animations group, click Custom Animation. On the slide, select the text box. In the Custom Animation task pane, do the following: Click Add Effect, point to Entrance, and then click More Effects. In the Add Entrance Effect dialog box, under Basic, click Fly In. Select the animation effect (fly-in effect for the text box). Click the arrow to the right of the select effect, and then click Effect Options. In the Fly In dialog box, do the following: On the Effect tab, in the Direction list, select From Right. On the Timing tab, do the following: In the Start list, select With Previous. In the Speed box, enter 16 seconds. In the Repeat list, select Until End of Slide. On the slide, select the text box. On the Home tab, in the Clipboard group, click the arrow under Paste, and then click Duplicate. In the Custom Animation task pane, select the second animation effect (fly-in effect for the second text box). Click the arrow to the right of the selected effect, and then click Timing. In the Fly In dialog box, on the Timing tab, in the Delay box, enter 8. (Note: You may need to adjust the delay time if the length of your text is different than the example above.) On the slide, drag the second text box on top of the first text box. On the Home tab, in the Editing group, click Select, and then click Selection Pane. In the Selection and Visibility pane, press and hold CTRL, and then select both text boxes. On the Home tab, in the Drawing group, click Arrange, point to Align, and then do the following: Click Align Selected Objects. Click Align Middle. Click Align Center. To reproduce the background effects on this slide, do the following: Right-click the slide background area, and then click Format Background. In the Format Background dialog box, click Fill in the left pane, and then select Picture or texture fill in the Fill pane. Under Insert from, click File. In the Insert Picture dialog box, select a picture, and then click Insert. On the Home tab, in the Drawing group, click Shapes, and then under Rectangles click Rectangle (first option from the left). On the slide, drag to draw a rectangle. Select the rectangle. Under Drawing Tools, on the Format tab, in the Size group, do the following: In the Shape Height box, enter 7.5”. In the Shape Width box, enter 1”. Under Drawing Tools, on the Format tab, in the Shape Styles group, click the arrow next to Shape Outline, and then click No Outline. On the Home Tab, in the Drawing group, click the arrow next to Shape Fill, point to Gradient, and then click More Gradients. In the Format Shape dialog box, click Fill in the left pane, select Gradient fill in the Fill pane, and then do the following: In the Type list, select Linear. Click the button next to Direction, and then click Linear Right (first row, fourth option from the left). Under Gradient stops, click Add or Remove until two stops appear in the drop-down list. Also under Gradient stops, customize the gradient stops that you added as follows: Select Stop 1 from the list, and then do the following: In the Stop position box, enter 0%. Click the button next to Color, and then under Theme Colors click Black, Text 1 (first row, second option from the left). In the Transparency box, enter 0%. Select Stop 2 from the list, and then do the following: In the Stop position box, enter 100%. Click the button next to Color, and then under Theme Colors click Black, Text 1, (first row, second option from the left). In the Transparency box, enter 100%. On the slide, select the rectangle. On the Home tab, in the Drawing group, click Arrange, point to Align, and then do the following: Click Align to Slide. Click Align Left. Select the rectangle. On the Home tab, in the Clipboard group, click the arrow under Paste, and then click Duplicate. Select the duplicate rectangle. On the Home Tab, in the Drawing group, click the arrow next to Shape Fill, point to Gradient, and then click Linear Left (second row, third option from the left). With the duplicate rectangle still selected, on the Home tab, in the Drawing group, click Arrange, point to Align, and then do the following: Click Align Right.
 To reproduce the text effects on this slide, do the following: On the Home tab, in the Slides group, click Layout, and then click Blank. On the Insert tab, in the Text group, click Text Box, and then on the slide, drag to draw the text box. Enter text in the text box. (Note: You may want to add a bullet point at the end of your text, as in the example above. On the Insert tab, in the Text group, click Symbol. In the Symbol dialog box, in the Font list, select (normal text). In the Subset list, select General Punctuation. In the Character Code box, enter 2022 to select BULLET, and then click Insert.) Select the text. On the Home tab, in the Font group, do the following: In the Font list, select Gill Sans MT. In the Font Size list, select 36. Click Bold. Click the arrow next to Font Color, and then under Theme Colors click White, Background 1 (first row, first option from the left). On the Home tab, in the Paragraph group, click Align Text Left to align the text left in the text box. (Note: If the text wraps to more than one line, drag the adjustment handles on the text box to widen it until the text fits on one line.) Drag the text box to the left of the lower left edge of the slide. (Note: To see beyond the edges of the slide, on the View tab, click Zoom, and then in the Zoom dialog box, in the Percent box, enter 40%.) To reproduce the animation effects on this slide, do the following: On the Animations tab, in the Animations group, click Custom Animation. On the slide, select the text box. In the Custom Animation task pane, do the following: Click Add Effect, point to Entrance, and then click More Effects. In the Add Entrance Effect dialog box, under Basic, click Fly In. Select the animation effect (fly-in effect for the text box). Click the arrow to the right of the select effect, and then click Effect Options. In the Fly In dialog box, do the following: On the Effect tab, in the Direction list, select From Right. On the Timing tab, do the following: In the Start list, select With Previous. In the Speed box, enter 16 seconds. In the Repeat list, select Until End of Slide. On the slide, select the text box. On the Home tab, in the Clipboard group, click the arrow under Paste, and then click Duplicate. In the Custom Animation task pane, select the second animation effect (fly-in effect for the second text box). Click the arrow to the right of the selected effect, and then click Timing. In the Fly In dialog box, on the Timing tab, in the Delay box, enter 8. (Note: You may need to adjust the delay time if the length of your text is different than the example above.) On the slide, drag the second text box on top of the first text box. On the Home tab, in the Editing group, click Select, and then click Selection Pane. In the Selection and Visibility pane, press and hold CTRL, and then select both text boxes. On the Home tab, in the Drawing group, click Arrange, point to Align, and then do the following: Click Align Selected Objects. Click Align Middle. Click Align Center. To reproduce the background effects on this slide, do the following: Right-click the slide background area, and then click Format Background. In the Format Background dialog box, click Fill in the left pane, and then select Picture or texture fill in the Fill pane. Under Insert from, click File. In the Insert Picture dialog box, select a picture, and then click Insert. On the Home tab, in the Drawing group, click Shapes, and then under Rectangles click Rectangle (first option from the left). On the slide, drag to draw a rectangle. Select the rectangle. Under Drawing Tools, on the Format tab, in the Size group, do the following: In the Shape Height box, enter In the Shape Width box, enter 1 . Under Drawing Tools, on the Format tab, in the Shape Styles group, click the arrow next to Shape Outline, and then click No Outline. On the Home Tab, in the Drawing group, click the arrow next to Shape Fill, point to Gradient, and then click More Gradients. In the Format Shape dialog box, click Fill in the left pane, select Gradient fill in the Fill pane, and then do the following: In the Type list, select Linear. Click the button next to Direction, and then click Linear Right (first row, fourth option from the left). Under Gradient stops, click Add or Remove until two stops appear in the drop-down list. Also under Gradient stops, customize the gradient stops that you added as follows: Select Stop 1 from the list, and then do the following: In the Stop position box, enter 0%. Click the button next to Color, and then under Theme Colors click Black, Text 1 (first row, second option from the left). In the Transparency box, enter 0%. Select Stop 2 from the list, and then do the following: In the Stop position box, enter 100%. Click the button next to Color, and then under Theme Colors click Black, Text 1, (first row, second option from the left). In the Transparency box, enter 100%. On the slide, select the rectangle. On the Home tab, in the Drawing group, click Arrange, point to Align, and then do the following: Click Align to Slide. Click Align Left. Select the rectangle. On the Home tab, in the Clipboard group, click the arrow under Paste, and then click Duplicate. Select the duplicate rectangle. On the Home Tab, in the Drawing group, click the arrow next to Shape Fill, point to Gradient, and then click Linear Left (second row, third option from the left). With the duplicate rectangle still selected, on the Home tab, in the Drawing group, click Arrange, point to Align, and then do the following: Click Align Right.")
3
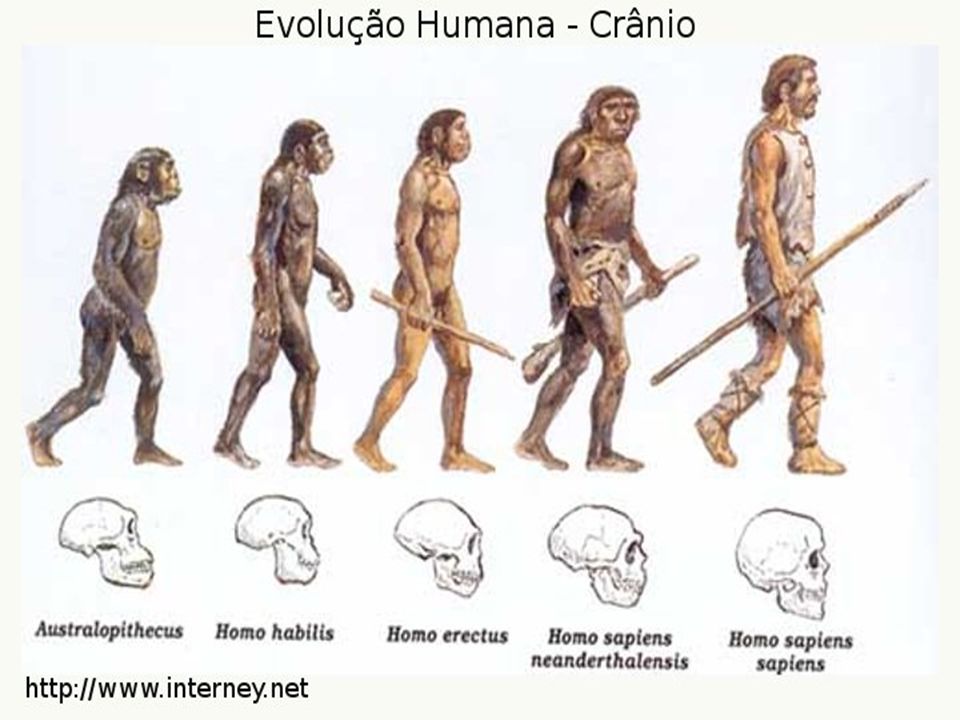
A PRÉ-HISTÓRIA Período que vai do aparecimento dos seres humanos à invenção da escrita.

4
PERÍODO PALEOLÍTICO OU IDADE DA PEDRA LASCADA
No começo de sua trajetória, o homem usou sobretudo a pedra (além do osso e madeira) para fazer seus instrumentos de trabalho. Por isso aqueles são chamados de Paleolítico.
 para fazer seus instrumentos de trabalho. Por isso aqueles são chamados de Paleolítico.")
5
Durante o Paleolítico, nossos ancestrais viviam da coleta de frutos e raízes, da caça e da pesca, sendo, por isso, chamados de caçadores e coletores. Organizavam-se em bandos e habitavam cavernas ou cabanas feitas com galhos e folhas de árvores, formando acampamentos. A total dependência do meio natural obrigava as comunidades a um deslocamento constante em busca de alimentos ou para fugir de algum perigo que as ameaçava (inundação, excesso de frio ou calor, etc.). Eram, portanto, comunidades nômades, ou seja, não tinham habitação fixa, estavam sempre mudando de lugar. O nomadismo, uma das principais características dos nossos antepassados, foi o responsável pela povoação do planeta.

6
-Além de procurar abrigo nas cavernas, nosso antepassado construía cabanas com galhos presos ao solo com pedras, cobertos com plantas. Mais tarde, para proteger-se do frio, usou também a pele e os ossos dos animais em suas construções.

7
-Os homens do Paleolítico caçavam animais grandes, como os mamutes e os cangurus gigantes, e outros menores, como a gazela. -Às vezes os caçadores disfarçavam-se com peles e chifres de animais e assustavam sua presa,forçando-a a correr em direção à armadilha que tinham preparado.

8
O trabalho de caçar, pescar e construir era feito pelos homens, e o de coletar, preparar os alimentos e cuidar das crianças cabia às mulheres. Podemos dizer que isso representou a primeira divisão de trabalho. -Os homens do paleolítico também foram excelentes artistas. Sem dúvida, entre as obras mais importantes daqueles homens, estão as misteriosas figuras de animais –touros, cavalos,bisões –pintados com carvão e tintas vegetais nas paredes das cavernas em que viviam. Como estas pinturas eram feitas em rochas, foram chamadas de rupestres.

9
-O domínio do fogo: A conquista do fogo representa momento importante do período Paleolítico. Segundo historiadores, teria ocorrido há mais ou menos 500 mil anos, nas terras vulcânicas dos vales da África oriental. Imagina-se que os hominídeos daquele tempo perderam o medo do fogo, provocado por combustão espontânea, raios ou vulcões. Passaram então a utilizá-lo para se aquecer, iluminar a noite, defender-se dos animais, cozinhar os alimentos.

10
PERÍODO NEOLÍTICO OU IDADE DA PEDRA POLIDA

11
O termo neolítico, escolhido para denominar o período que vai de 10
O termo neolítico, escolhido para denominar o período que vai de a a .C., significa “pedra nova” (do grego neo= “novo” e lithos = “pedra”) e refere-se ao fato de que os homens dessa época poliam a pedra usada na fabricação de seus instrumentos, aperfeiçoando sua técnica. Daí também a expressão “idade da pedra polida” -Revolução Neolítica : A prática da agricultura e a do pastoreio foram importantes conquistas do homem neolítico. Ele passou a produzir seu próprio alimento e a desenvolver técnicas de produção de cerâmica, tecelagem e instrumentos de pedra polida.Tornaram-se sedentários.
 e refere-se ao fato de que os homens dessa época poliam a pedra usada na fabricação de seus instrumentos, aperfeiçoando sua técnica. Daí também a expressão idade da pedra polida -Revolução Neolítica : A prática da agricultura e a do pastoreio foram importantes conquistas do homem neolítico. Ele passou a produzir seu próprio alimento e a desenvolver técnicas de produção de cerâmica, tecelagem e instrumentos de pedra polida.Tornaram-se sedentários.")
12
A melhoria na alimentação, propiciada pela agricultura e pelo pastoreio, favoreceu o aumento do número de crianças e um cuidado maior com os mais velhos, as maiores vítimas do abandono no tempo dos deslocamentos freqüentes. Com a prática da agricultura, os grupos humanos passaram a necessitar de recipientes em que pudessem armazenar as sobras e cozinhar cereais, como o trigo e a cevada. A invenção da cerâmica veio atender a esta necessidade. Assim, o barro modelado e cozido foi usado para fazer vasos, potes, jarros e panelas.Na foto, vaso encontrado na China, por volta de 2000 a .C.

13
Quanto à origem da religião pode-se imaginar que as cerimônias e os objetos religiosos surgiram como uma tentativa de compreender os fenômenos da natureza – chuvas, trovões, secas, ventanias -, que as pessoas não conseguiam explicar racionalmente. Os arqueólogos descobriram alguns monumentos de pedra, como o Stonehenge, na Inglaterra, e o Carnac na França, que são desse período. Existem hipóteses de que esses monumentos seriam templos onde pessoas faziam cerimônias e sacrifícios. As antigas cabanas, feitas com ossos, pele de animais e folhas, foram substituídas por moradias de barro e madeira ou pedra. Na foto, interior de uma casa do período Neolítico, encontrada em Orkney,Escócia.

Apresentações semelhantes


 até o surgimento da escrita.>")


, também conhecido como Idade da Pedra Lascada, refere-se ao período pré- histórico que vai de cerca de 2,5.>")


