Carregar apresentação
A apresentação está carregando. Por favor, espere

1
Prof. Esp. Ribamar II Corrêa
HISTÓRIA DA ARTE Prof. Esp. Ribamar II Corrêa 2010 Custom animation effects: line sweeps in picture and text (Basic) To reproduce the shape effects on this slide, do the following: On the Home tab, in the Slides group, click Layout, and then click Blank. On the Home tab, in the Drawing group, click Shapes, and then under Lines click Line (first option from the left). On the slide, press and hold SHIFT, and then drag to draw a straight, vertical line. Select the line. Under Drawing Tools, on the Format tab, in the Size group, in the Shape Width box, enter 7.5”. Under Drawing Tools, on the Format tab, in the Shape Styles group, click the Format Shape dialog box launcher. In the Format Shape dialog box, click Line Color in the left pane. In the Line Color pane, select Solid line, click the button next to Color, and then under Theme Colors click Black, Text 1 (first row, second option from the left). Also in the Format Shape dialog box, click Line Style in the left pane. In the Line Style pane, in the Weight box, enter 2 pt. Under Drawing Tools, on the Format tab, in the Shape Styles group, click Shape Effects, point to Glow, and then under Glow Variations click Accent color 1, 5 pt glow (first row, first option from the left). Under Drawing Tools, on the Format tab, in the Shape Styles group, click Shape Effects, point to Glow, point to More Glow Colors, and then under Theme Colors click White, Background 1 (first row, first option from the left). On the Home tab, in the Drawing group, click Arrange, point to Align, and then do the following: Click Align to Slide. Click Align Center. Click Align Middle. On the slide, select the line. On the Home tab, in the Clipboard group, click the arrow under Paste, and then click Duplicate. Drag the duplicate line slightly off the right edge of the slide. With the duplicate line still selected, on the Home tab, in the Drawing group, click Arrange, point to Align, and then do the following: On the Insert tab, in the Illustrations group, click Picture. In the Insert Picture dialog box, select a picture, and then click Insert. On the slide, select the picture. Under Picture Tools, on the Format tab, in the bottom right corner of the Size group, click the Size and Position dialog box launcher. In the Size and Position dialog box, on the Size tab, resize or crop the picture as needed so that under Size and rotate, the Height box is set to 7.5” and the Width box is set to 5”. Resize the picture under Size and rotate by entering values into the Height and Width boxes. Crop the picture under Crop from by entering values into the Left, Right, Top, and Bottom boxes. Click Align Right. To reproduce the text effects on this slide, do the following: On the Insert tab, in the Illustrations group, click Text Box. On the slide, drag to draw a text box. Enter text in the text box, and then select the text. On the Home tab, in the Font group, do the following: In the Font list, select Arial. In the Font Size list, select 28. Click Bold. Click the button next to Font Color, and then under Theme Colors click White, Background 1 (first row, first option from the left). On the Home tab, in the Paragraph group, click Align Text Right to align the text right in the text box. Drag the text box onto the left half of the slide. To reproduce the background effects on this slide, do the following: Right-click the slide background area, and then click Format Background. In the Format Background dialog box, click Fill in the left pane, select Gradient fill in the Fill pane, and then do the following: In the Type list, select Linear. Click the button next to Direction, and then click Linear Down (first row, second option from the left). Under Gradient stops, click Add or Remove until two stops appear in the drop-down list. Also under Gradient stops, customize the gradient stops that you added as follows: Select Stop 1 from the list, and then do the following: In the Stop position box, enter 40%. Click the button next to Color, and then click Black, Text 1 (first row, second option from the left). Select Stop 2 from the list, and then do the following: In the Stop position box, enter 100%. Click the button next to Color, and then click Black, Text 1, Lighter 50% (second row, second option from the left). To reproduce the animation effects on this slide, do the following: On the Animations tab, in the Animations group, click Custom Animation. Select the line off the right edge of the slide. In the Custom Animation task pane, do the following: Click Add Effect, point to Entrance, and then click More Effects. In the Add Entrance Effect dialog box, under Basic, click Fly In. Select the animation effect (fly-in effect for the second line). Under Modify: Fly In, do the following: In the Start list, select After Previous. In the Direction list, select From Left. In the Speed list, select Fast. On the Home tab, in the Editing group, click Select, and then click Selection Pane. In the Selection and Visibility pane, select the first line you created (in the middle of the slide). In the Custom Animation task pane, do the following: Select the second animation effect (fly-in effect for the first line). Under Modify: Fly In, do the following: In the Direction list, select From Right. On the slide, select the picture. In the Custom Animation task pane, do the following: Click Add Effect, point to Entrance, and then click More Effects. In the Add Entrance Effect dialog box, under Basic, click Wipe. Select the third animation effect (wipe effect for the picture). Under Modify: Wipe, do the following: In the Start list, select With Previous. On the slide, select the text box. In the Custom Animation task pane, do the following: Select the fourth animation effect (fly-in effect for the text box). Under Modify: Fly In, do the following:
 To reproduce the shape effects on this slide, do the following: On the Home tab, in the Slides group, click Layout, and then click Blank. On the Home tab, in the Drawing group, click Shapes, and then under Lines click Line (first option from the left). On the slide, press and hold SHIFT, and then drag to draw a straight, vertical line. Select the line. Under Drawing Tools, on the Format tab, in the Size group, in the Shape Width box, enter Under Drawing Tools, on the Format tab, in the Shape Styles group, click the Format Shape dialog box launcher. In the Format Shape dialog box, click Line Color in the left pane. In the Line Color pane, select Solid line, click the button next to Color, and then under Theme Colors click Black, Text 1 (first row, second option from the left). Also in the Format Shape dialog box, click Line Style in the left pane. In the Line Style pane, in the Weight box, enter 2 pt. Under Drawing Tools, on the Format tab, in the Shape Styles group, click Shape Effects, point to Glow, and then under Glow Variations click Accent color 1, 5 pt glow (first row, first option from the left). Under Drawing Tools, on the Format tab, in the Shape Styles group, click Shape Effects, point to Glow, point to More Glow Colors, and then under Theme Colors click White, Background 1 (first row, first option from the left). On the Home tab, in the Drawing group, click Arrange, point to Align, and then do the following: Click Align to Slide. Click Align Center. Click Align Middle. On the slide, select the line. On the Home tab, in the Clipboard group, click the arrow under Paste, and then click Duplicate. Drag the duplicate line slightly off the right edge of the slide. With the duplicate line still selected, on the Home tab, in the Drawing group, click Arrange, point to Align, and then do the following: On the Insert tab, in the Illustrations group, click Picture. In the Insert Picture dialog box, select a picture, and then click Insert. On the slide, select the picture. Under Picture Tools, on the Format tab, in the bottom right corner of the Size group, click the Size and Position dialog box launcher. In the Size and Position dialog box, on the Size tab, resize or crop the picture as needed so that under Size and rotate, the Height box is set to 7.5 and the Width box is set to 5 . Resize the picture under Size and rotate by entering values into the Height and Width boxes. Crop the picture under Crop from by entering values into the Left, Right, Top, and Bottom boxes. Click Align Right. To reproduce the text effects on this slide, do the following: On the Insert tab, in the Illustrations group, click Text Box. On the slide, drag to draw a text box. Enter text in the text box, and then select the text. On the Home tab, in the Font group, do the following: In the Font list, select Arial. In the Font Size list, select 28. Click Bold. Click the button next to Font Color, and then under Theme Colors click White, Background 1 (first row, first option from the left). On the Home tab, in the Paragraph group, click Align Text Right to align the text right in the text box. Drag the text box onto the left half of the slide. To reproduce the background effects on this slide, do the following: Right-click the slide background area, and then click Format Background. In the Format Background dialog box, click Fill in the left pane, select Gradient fill in the Fill pane, and then do the following: In the Type list, select Linear. Click the button next to Direction, and then click Linear Down (first row, second option from the left). Under Gradient stops, click Add or Remove until two stops appear in the drop-down list. Also under Gradient stops, customize the gradient stops that you added as follows: Select Stop 1 from the list, and then do the following: In the Stop position box, enter 40%. Click the button next to Color, and then click Black, Text 1 (first row, second option from the left). Select Stop 2 from the list, and then do the following: In the Stop position box, enter 100%. Click the button next to Color, and then click Black, Text 1, Lighter 50% (second row, second option from the left). To reproduce the animation effects on this slide, do the following: On the Animations tab, in the Animations group, click Custom Animation. Select the line off the right edge of the slide. In the Custom Animation task pane, do the following: Click Add Effect, point to Entrance, and then click More Effects. In the Add Entrance Effect dialog box, under Basic, click Fly In. Select the animation effect (fly-in effect for the second line). Under Modify: Fly In, do the following: In the Start list, select After Previous. In the Direction list, select From Left. In the Speed list, select Fast. On the Home tab, in the Editing group, click Select, and then click Selection Pane. In the Selection and Visibility pane, select the first line you created (in the middle of the slide). In the Custom Animation task pane, do the following: Select the second animation effect (fly-in effect for the first line). Under Modify: Fly In, do the following: In the Direction list, select From Right. On the slide, select the picture. In the Custom Animation task pane, do the following: Click Add Effect, point to Entrance, and then click More Effects. In the Add Entrance Effect dialog box, under Basic, click Wipe. Select the third animation effect (wipe effect for the picture). Under Modify: Wipe, do the following: In the Start list, select With Previous. On the slide, select the text box. In the Custom Animation task pane, do the following: Select the fourth animation effect (fly-in effect for the text box). Under Modify: Fly In, do the following:")
2
NEOCLASSICISMO CARACTERÍSTICAS
O neoclassicismo também é considerado uma reação contra os exageros do Rococó, cultuando principalmente a razão, a ordem, a clareza, a nobreza e a pureza, atributos relacionados ao movimento iluminista, sendo essa época nomeada por alguns autores como a “Era da Razão”. Roma era considerada um dos principais centros do movimento, cidade onde vivia o crítico de arte alemão Joachim Winckelmann ( ), considerado o fundador teórico do neoclassicismo, principalmente através de obras como “História da Arte Antiga
, considerado o fundador teórico do neoclassicismo, principalmente através de obras como História da Arte Antiga.")
3
NEOCLASSICISMO PINTURA O JURAMENTO DOS HORÁCIOS, 1874
DO PINTOR FRANCÊS JACQUES-LOUIS DAVID

4
NEOCLASSICISMO PINTURA A MORTE DE SÓCRATES, 1787 JACQUES-LOUIS DAVID
The Metropolitan Museum of Art, Nova York

5
NEOCLASSICISMO PINTURA O RAPTO DA SABINAS, 1796-1799
JACQUES-LOUIS DAVID Museu do Louvre, Paris

6
NEOCLASSICISMO PINTURA A Banhista de Valpinçon, 1808
Dominique Ingres,

7
NEOCLASSICISMO PINTURA A Fonte, 1856 Dominique Ingres,

8
NEOCLASSICISMO PINTURA Retrato da Marquesa de Belas, 1816
Nicolas Antoine Taunay,

9
NEOCLASSICISMO PINTURA
Vista do Outeiro, Praia e Igreja da Glória, 1817 Nicolas Antoine Taunay,

10
NEOCLASSICISMO PINTURA Entrada da Baia e da cidade do Rio a partir
do terreno do Convento de Santo Antônio, 1816 Nicolas Antoine Taunay,

11
NEOCLASSICISMO PINTURA Régulus voltando a Cartago, 1791
Jean-Baptiste Debret,

12
NEOCLASSICISMO PINTURA Primeira Distribuição das Cruzes da Legião
de Honra, em 14 de julho de 1804, 1812 Jean-Baptiste Debret,

13
NEOCLASSICISMO PINTURA Caçador de escravo, 1820-1830
Jean-Baptiste Debret,

14
NEOCLASSICISMO PINTURA Colar de Ferro Jean-Baptiste Debret,

15
NEOCLASSICISMO PINTURA Guerreiro Indígena à cavalo,
Jean-Baptiste Debret,

16
NEOCLASSICISMO PINTURA Retrato de D. João VI
Jean-Baptiste Debret,

17
NEOCLASSICISMO PINTURA Busto de Camões,
Auguste Marie Taunay,

18
NEOCLASSICISMO PINTURA General Lasalle, 1812
Auguste Marie Taunay,

19
NEOCLASSICISMO PINTURA O Gênio do Brasil, Auguste Marie Taunay,

20
NEOCLASSICISMO ESCULTURA Dédalo e Ícaro, Antônio Canova,

21
NEOCLASSICISMO ESCULTURA Psique revivida pelo beijo de Eros,
Antônio Canova,

22
NEOCLASSICISMO ESCULTURA Teseu vencendo o Minotauro, 1781
Antônio Canova,

23
NEOCLASSICISMO ESCULTURA Paulina Borghese, Antônio Canova,

24
NEOCLASSICISMO ESCULTURA As Três Graças, Antônio Canova

25
NEOCLASSICISMO ESCULTURA Hebe Canova

26
NEOCLASSICISMO ESCULTURA PERSEU COM A CABEÇA DA MEDUSA, 1800
ANTÔNIO CANOVA

27
NEOCLASSICISMO ESCULTURA Busto de Napoleão Antônio Canova

28
NEOCLASSICISMO ESCULTURA Busto de Minerva,
Auguste Marie Taunay,

29
NEOCLASSICISMO ESCULTURA Ninfa picada por um escorpião, 1845
Lorenzo Bartolini,

30
NEOCLASSICISMO ESCULTURA JASÃO E VELO DE OURO, 1803 BERTEL THORVALDSEN

31
NEOCLASSICISMO ESCULTURA MERCÚRIO ATANDO SUAS SANDÁLIAS, 1834
FRANÇOIS RUDE

32
NEOCLASSICISMO ESCULTURA A MARSELHESA, 1933 FRANÇOIS RUDE

33
NEOCLASSICISMO ESCULTURA MONUMENTO A WILLIAM HUSKISSON JOHN GIBSON

34
NEOCLASSICISMO ARQUITETURA
Materiais nobres (pedra, mármore, granito, madeiras) Processos técnicos avançados Sistemas construtivos simples Esquemas mais complexos, a par das linhas ortogonais Formas regulares, geométricas e simétricas Volumes corpóreos, maciços, bem definidos por planos murais lisos Uso de abóbada de berço ou de aresta Uso de cúpulas, com frequência marcadas pela monumentalidade Espaços interiores organizados segundo critérios geométricos e formais de grande racionalidade Pórticos colunados Entablamentos direitos Frontões triangulares A decoração recorreu a elementos estruturais com formas clássicas, à pintura rural e ao relevo em estuque Valorizou a intimidade e o conforto nas mansões familiares Decoração de carácter estrutural
 Processos técnicos avançados. Sistemas construtivos simples. Esquemas mais complexos, a par das linhas ortogonais. Formas regulares, geométricas e simétricas. Volumes corpóreos, maciços, bem definidos por planos murais lisos. Uso de abóbada de berço ou de aresta. Uso de cúpulas, com frequência marcadas pela monumentalidade. Espaços interiores organizados segundo critérios geométricos e. formais de grande racionalidade. Pórticos colunados. Entablamentos direitos. Frontões triangulares. A decoração recorreu a elementos estruturais com formas clássicas, à pintura rural e ao relevo em estuque. Valorizou a intimidade e o conforto nas mansões familiares. Decoração de carácter estrutural.")
35
NEOCLASSICISMO ARQUITETURA FRANÇA
o O estilo neoclássico na França teve como um dos principais exemplares: o Panthéon – antiga Igreja de Santa Genova, iniciada por Soufflot em 1758. o Soufflot procurou criar uma síntese entre a leveza das construções góticas e as formas da Antiguidade Clássica: a planta em cruz grega persegue os ideais do Renascimento. Os elementos de suporte já não são as paredes, mas as colunas. O betão armado, aplicado nas 22 colunas que formam o pórtico, é um elemento precursor da arquitetura moderna.

36
Igreja de Santa Genoveva que foi transformada posteriormente em
Pantheon de Paris, foi projetada por Jacques Germain Souflot( ). No frontal encontra-se trabalhos escultóricos de David d’Angers( )
. No frontal encontra-se trabalhos escultóricos de David d’Angers( )")
37
FRANÇA Panthéon

38
FRANÇA Em seguida, o neoclacissismo recebeu um grande auxílio dos ideais da Revolução Francesa de 1789 para se popularizar. Napoleão foi um grande incentivador do movimento, estimulando construções como: A Igreja de Maria Madalena, foi projetada por Pierre Barthelmy Vignon ( ), com inspirações clássicas como os templos coríntios romanos.
, com inspirações clássicas. como os templos coríntios romanos.")
40
Arco do Triunfo (francês: Arc de
Triomphe) é um monumento, localizado na cidade de Paris, construído em comemoração às vitórias militares de Napoleão Bonaparte, o qual ordenou a sua construção em Inaugurado em 1836, a monumental obra detém, gravados, os nomes de 128 batalhas e 558 generais. Em sua base, situa-se o Túmulo do soldado desconhecido (1920). O arco localiza-se na praça Charles de Gaulle, uma das duas extremidades da avenida Champs-Élysées.
 é um monumento, localizado na cidade de Paris, construído em comemoração às. vitórias militares de Napoleão. Bonaparte, o qual ordenou a sua. construção em Inaugurado. em 1836, a monumental obra. detém, gravados, os nomes. de 128 batalhas e 558 generais. Em sua base, situa-se o Túmulo. do soldado desconhecido (1920). O arco localiza-se na praça Charles. de Gaulle, uma das duas. extremidades da avenida. Champs-Élysées.")
41
NEOCLASSICISMO ARQUITETURA Portão Brandenburg, 1789-1794
Karl Gotthard Langhans, Alemanha

42
ALEMANHA Na arquitetura neoclássica alemã, destaca-se Karl Gotthard Langhans (1732 - 1808) e seu Portão Brandenburg, em Berlim, construído entre 1789 e 1794.

43
Fachada do British Museum (Londres)
")
44
NEOCLASSICISMO ARQUITETURA Palácio da Ajuda, 1802 Portugal

45
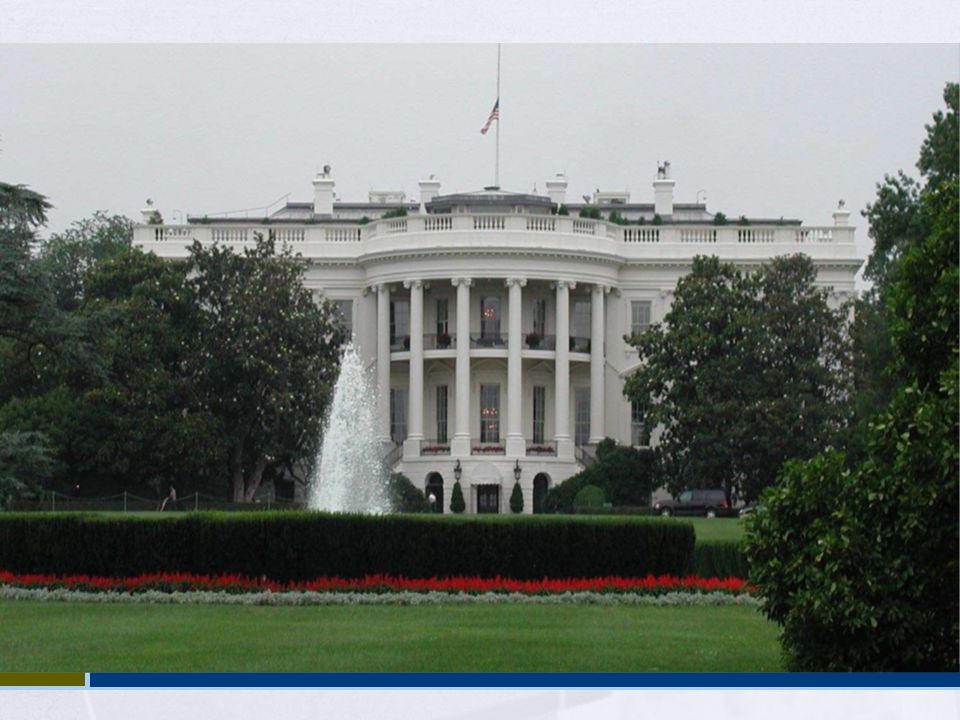
Capitólio de Washington

47
Baixe essa apresentação em: www.teclandoseaprende.wordpress.com
Área: dicas do professor Custom animation effects: descending text levels (Basic) To reproduce the rectangle on this slide, do the following: On the Home tab, in the Slides group, click Layout, and then click Blank. On the Home tab, in the Drawing group, click Shapes, and then under Rectangle click Rounded Rectangle (second option from the left). On the slide, drag to draw a rectangle. Select the rectangle. Under Drawing Tools, on the Format tab, in the Size group, do the following: In the Shape Height box, enter 3.08”. In the Shape Width box, enter 4.33”. Under Drawing Tools, on the Format tab, in the Shapes Styles group, click the arrow next to Shape Outline, and then click No Outline. Under Drawing Tools, on the Format tab, in the bottom right corner in the Shapes Styles group, click the Format Shape dialog box launcher. In the Format Shape dialog box, click Fill in the left pane, select Gradient fill in the Fill pane, and then do the following: In the Type list, select Linear. Click the button next to Direction, and then click Linear Down (first row, second option from the left). Under Gradient stops, click Add or Remove until two stops appear in the drop-down list. Also under Gradient stops, customize the gradient stops that you added as follows: Select Stop 1 from the list, and then do the following: In the Stop position box, enter 0%. Click the button next to Color, and then under Theme Colors click White, Background 1 (first row, first option from the left). In the Transparency box, enter 25%. Select Stop 2 from the list, and then do the following: In the Stop position box, enter 20%. In the Transparency box, enter 69%. Also in the Format Shape dialog box, click Shadow in the left pane. In the Shadow pane, click the button next to Presets, under Outer click Offset Diagonal Bottom Left (first row, third option from the left), and then do the following: In the Transparency box, enter 72%. In the Size box, enter 100%. In the Blur box, enter pt. In the Angle box, enter 141°. In the Distance box, enter 19.7 pt. Also in the Format Shape dialog box, click 3-D Format in the left pane, and then do the following in the 3-D Format pane: Under Bevel, click the button next to Top, and then under Bevel click Circle (first row, first option from the left). Next to Top, in the Width box, enter 7 pt, in the Height box, enter 7 pt. Under Surface, click the button next to Material, and then under Standard click Metal (fourth option from the left). Click the button next to Lighting, and then under Neutral click Contrasting (second row, second option from the left). In the Angle box, enter 75°. On the slide, drag the rectangle into the bottom right corner. To reproduce the rectangle animation effects on this slide, do the following: On the Animations tab, in the Animations group, click Custom Animation. On the slide, select the rectangle. In the Custom Animation task pane, do the following: Click Add Effect, point to Entrance, and then click More Effects. In the Add Entrance Effect dialog box, under Moderate, click Ascend. Select the animation effect (ascend effect for the rectangle). Under Modify: Ascend, do the following: In the Start list, select With Previous. In the Speed list, select Medium. To reproduce the text effects on this slide, do the following: On the Insert tab, in the Text group, click Text Box, and then on the slide, drag to draw the text box. Enter three lines of text with paragraph breaks in the text box. Select the text, and then on the Home tab, in the Font group, do the following: In the Font list, select Candara. In the Font Size list, select 28. Click the arrow next to Font Color, and then under Theme Colors click Aqua, Accent 5; Darker 50% (sixth row, ninth option from the left). On the Home tab, in the Paragraph group, click Align Text Left to position the text left in the text box. On the slide, drag the text box onto the rectangle. To reproduce the text animation effects on this slide, do the following: On the slide, select the text box. In the Custom Animation task pane, do the following: Click Add Effect, point to Entrance, and then click More Effects. In the Add Entrance Effect dialog box, under Moderate, click Descend. Select the second animation effect (descend effect for the text box). Click the arrow to the right of the selected effect, and then click Effect Options. In the Descend dialog box, do the following: On the Timing tab, do the following: In the Start box, select With Previous. In the Speed box, select 1 seconds (Fast). On the Text Animation tab, in the Group text list, select By 1st Level Paragraphs. Also in the Custom Animation task pane, click the double arrow under the second animation effect to expand the list of effects, and then do the following: Select the new second animation effect in the list (descend effect for the first line of text). Click the arrow to the right of the selected effect, and then click Timing. In the Descend dialog box, on the Timing tab, in the Delay box, enter 1. Select the third animation effect (descend effect for the second line of text). Click the arrow to the right of the selected effect, and then click Timing. In the Descend dialog box, on the Timing tab, do the following: In the Start list select With Previous. In the Delay box, enter 1.5. Select the fourth animation effect (descend effect for the second line of text). Click the arrow to the right of the selected effect, and then click Timing. In the Descend dialog box, on the Timing tab, do the following: In the Delay box, enter 2. To reproduce the background effects on this slide, do the following: On the Design tab, in the bottom right corner of the Background group, click the Format Background dialog box launcher. In the Format Background dialog box, click Fill in the left pane, select Picture or texture fill in the Fill pane, and then under Insert from click File. In the Insert Picture dialog box, select a picture, and then click Insert.
 To reproduce the rectangle on this slide, do the following: On the Home tab, in the Slides group, click Layout, and then click Blank. On the Home tab, in the Drawing group, click Shapes, and then under Rectangle click Rounded Rectangle (second option from the left). On the slide, drag to draw a rectangle. Select the rectangle. Under Drawing Tools, on the Format tab, in the Size group, do the following: In the Shape Height box, enter In the Shape Width box, enter Under Drawing Tools, on the Format tab, in the Shapes Styles group, click the arrow next to Shape Outline, and then click No Outline. Under Drawing Tools, on the Format tab, in the bottom right corner in the Shapes Styles group, click the Format Shape dialog box launcher. In the Format Shape dialog box, click Fill in the left pane, select Gradient fill in the Fill pane, and then do the following: In the Type list, select Linear. Click the button next to Direction, and then click Linear Down (first row, second option from the left). Under Gradient stops, click Add or Remove until two stops appear in the drop-down list. Also under Gradient stops, customize the gradient stops that you added as follows: Select Stop 1 from the list, and then do the following: In the Stop position box, enter 0%. Click the button next to Color, and then under Theme Colors click White, Background 1 (first row, first option from the left). In the Transparency box, enter 25%. Select Stop 2 from the list, and then do the following: In the Stop position box, enter 20%. In the Transparency box, enter 69%. Also in the Format Shape dialog box, click Shadow in the left pane. In the Shadow pane, click the button next to Presets, under Outer click Offset Diagonal Bottom Left (first row, third option from the left), and then do the following: In the Transparency box, enter 72%. In the Size box, enter 100%. In the Blur box, enter pt. In the Angle box, enter 141°. In the Distance box, enter 19.7 pt. Also in the Format Shape dialog box, click 3-D Format in the left pane, and then do the following in the 3-D Format pane: Under Bevel, click the button next to Top, and then under Bevel click Circle (first row, first option from the left). Next to Top, in the Width box, enter 7 pt, in the Height box, enter 7 pt. Under Surface, click the button next to Material, and then under Standard click Metal (fourth option from the left). Click the button next to Lighting, and then under Neutral click Contrasting (second row, second option from the left). In the Angle box, enter 75°. On the slide, drag the rectangle into the bottom right corner. To reproduce the rectangle animation effects on this slide, do the following: On the Animations tab, in the Animations group, click Custom Animation. On the slide, select the rectangle. In the Custom Animation task pane, do the following: Click Add Effect, point to Entrance, and then click More Effects. In the Add Entrance Effect dialog box, under Moderate, click Ascend. Select the animation effect (ascend effect for the rectangle). Under Modify: Ascend, do the following: In the Start list, select With Previous. In the Speed list, select Medium. To reproduce the text effects on this slide, do the following: On the Insert tab, in the Text group, click Text Box, and then on the slide, drag to draw the text box. Enter three lines of text with paragraph breaks in the text box. Select the text, and then on the Home tab, in the Font group, do the following: In the Font list, select Candara. In the Font Size list, select 28. Click the arrow next to Font Color, and then under Theme Colors click Aqua, Accent 5; Darker 50% (sixth row, ninth option from the left). On the Home tab, in the Paragraph group, click Align Text Left to position the text left in the text box. On the slide, drag the text box onto the rectangle. To reproduce the text animation effects on this slide, do the following: On the slide, select the text box. In the Custom Animation task pane, do the following: Click Add Effect, point to Entrance, and then click More Effects. In the Add Entrance Effect dialog box, under Moderate, click Descend. Select the second animation effect (descend effect for the text box). Click the arrow to the right of the selected effect, and then click Effect Options. In the Descend dialog box, do the following: On the Timing tab, do the following: In the Start box, select With Previous. In the Speed box, select 1 seconds (Fast). On the Text Animation tab, in the Group text list, select By 1st Level Paragraphs. Also in the Custom Animation task pane, click the double arrow under the second animation effect to expand the list of effects, and then do the following: Select the new second animation effect in the list (descend effect for the first line of text). Click the arrow to the right of the selected effect, and then click Timing. In the Descend dialog box, on the Timing tab, in the Delay box, enter 1. Select the third animation effect (descend effect for the second line of text). Click the arrow to the right of the selected effect, and then click Timing. In the Descend dialog box, on the Timing tab, do the following: In the Start list select With Previous. In the Delay box, enter 1.5. Select the fourth animation effect (descend effect for the second line of text). Click the arrow to the right of the selected effect, and then click Timing. In the Descend dialog box, on the Timing tab, do the following: In the Delay box, enter 2. To reproduce the background effects on this slide, do the following: On the Design tab, in the bottom right corner of the Background group, click the Format Background dialog box launcher. In the Format Background dialog box, click Fill in the left pane, select Picture or texture fill in the Fill pane, and then under Insert from click File. In the Insert Picture dialog box, select a picture, and then click Insert.")
Apresentações semelhantes