Carregar apresentação
A apresentação está carregando. Por favor, espere

1
Aborto Bioética Ana Carolina, André Longobardi, Elissa Restelli, Fabiana Amoroso, Isabella Genaro, Thaís Santos

2
Intro Aborto é, por definição, o término intencional da gravidez por meio de métodos cirúrgicos. Segundo médicos, o produto da concepção não deve pesar mais de 500g ou 20 semanas de gestação

3
QUESTÃO: O produto da concepção pode ser considerado apenas um aglomerado de células ou um indivíduo? Para alguns, a massa celular indiferenciada não pode ser considerada um indivíduo. São após 12 semanas que o córtex cerebral se forma por completo.

4
Fanáticos Religiosos são contra o aborto pois dizem ser a morte da criança no ventre. Para eles, a vida começa logo após a formação do embrião. A idéia de que o feto tem direito à vida é o que mais se discute até hoje.

5
Microscopia eletrônica de um embrião com 14 dias
Aglomerado de células indiferenciadas. Alguns dizem que já pode ser considerado uma vida, outros dizem que não.

6
Embrião com aproximadamente 14 semanas
O sistema nervoso (córtex cerebral) já esta formado. Atividade cerebral é evidente e o coração começa a bater. Membros são visíveis.
 já esta formado. Atividade cerebral é evidente e o coração começa a bater. Membros são visíveis.")
7
Legislação Segundo o Código Penal Brasileiro, o aborto é considerado legal em duas situações: - Risco à gestante (aborto necessário) ou - Casos de estupro
 ou - Casos de estupro")
8
O aborto por anencefalia, razões sociais/economicas e aborto a prazo (até 12 semanas de gestação) não são permitidos no Brasil. Art Provocar aborto em si mesma ou consentir que outrem lho provoque: Pena - detenção, de 1 (um) a 3 (três) anos.
 a 3 (três) anos.")
9
Art Provocar aborto, sem o consentimento da gestante: Pena - reclusão, de 3 (três) a 10 (dez) anos. Art Provocar aborto com o consentimento da gestante: Pena - reclusão, de 1 (um) a 4 (quatro) anos. Art Não se pune o aborto praticado por médico.
 a 10 (dez) anos. Art Provocar aborto com o consentimento da gestante: Pena - reclusão, de 1 (um) a 4 (quatro) anos. Art Não se pune o aborto praticado por médico.")
10
Tipos de Aborto Aborto Espontâneo Ocorre quando a gravidez é interrompida sem que seja por vontade da mulher. Pode acontecer por vários fatores biológicos, psicológicos e sociais que contribuem para que esta situação se verifique. Aborto Inevitável – Grávida começa a sangrar e colo do útero dilata. Aborto Espontâneo – Quando o feto morre ainda dentro do útero. Aborto Incompleto – Parte do conteúdo do útero é naturalmente expelido Aborto Completo – Todo conteúdo do útero é expelido por completo

11
Aborto Induzido A sucção ou aspiração; A dilatação e curetagem;
Procedimento usado para interromper a gravidez. É realizado de diversas maneiras: A sucção ou aspiração; A dilatação e curetagem; A dilatação e expulsão; Injeção de soluções salinas.

12
Aborto Ilegal O aborto ilegal é a interrupção de uma gravidez quando os motivos apresentados não se encontram enquadrados na legislação em vigor, ou quando é feito em locais que não estão oficialmente reconhecidos para o efeito. Também conhecido como aborto clandestino, é a grande causa de mortes (gestantes) no país e chega a atingir 15% das grávidas.
 no país e chega a atingir 15% das grávidas.")
13
Sucção

14
8 Semanas 16 Semanas

15
Aborto no Brasil Mesmo proibido por lei, o aborto ainda é indiscriminadamente realizado no Brasil. Pesquisas revelam que dentre um grupo de 2000 mulheres entre 18 e 29, 15% já realizaram algum tipo de aborto. Essa alta taxa esta claramente relacionada com o baixo índice de escolaridade das mães pesquisadas.

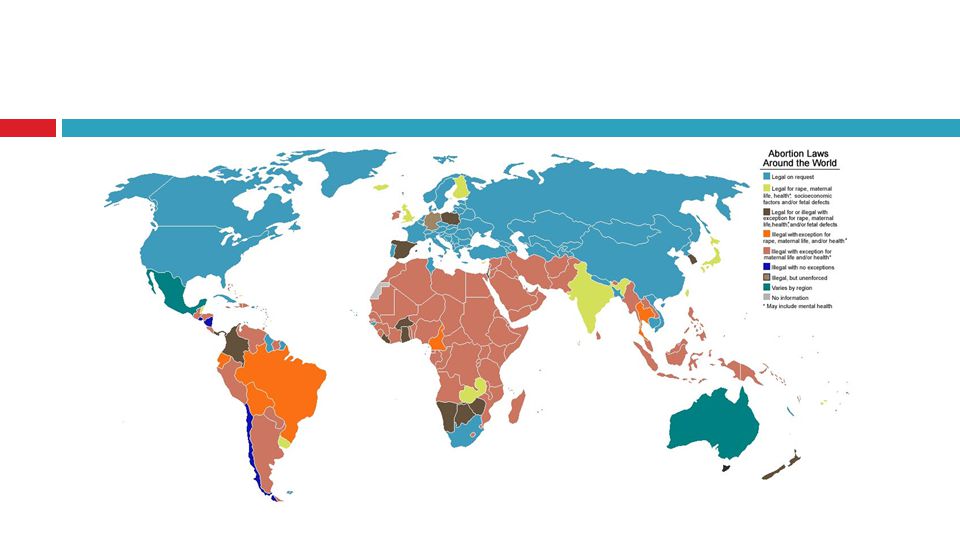
16
O Aborto Pelo Mundo Pode ser proibído no Brasil, porém é realizado em certos países.

18
Você é a favor ou contra o aborto?
Animated tipping scales (Difficult) To reproduce the shape effects on this slide, do the following: On the Home tab, in the Drawing group, click Shapes, and under Basic Shapes select Oval (first row, second option from the left). Press and hold SHIFT and on the slide, drag to draw a circle. On the Home tab, in the Slides group, click Layout, and then click Blank. Select the oval. Under Drawing Tools, on the Format tab, in the Size group, do the following: In the Shape Width box enter 2.16”. In the Shape Height box enter 2.16”. With the oval still selected, on the Home tab, in the bottom right corner of the Drawing group, click the Format Shape dialog box launcher. In the Format Shape dialog box, click Fill in the left pane, and in the Fill pane, do the following: Also in the Format Shape dialog box, click Line Color in the left pane, and in the Line Color pane click No line. Click the button next to Color, and then under Theme Colors select White, Background 1, Darker 25% (fourth row, first option from the left). Select Solid fill. Also in the Format Shape dialog box, click 3-D Format in the left pane, and in the 3-D Format pane do the following: Under Depth, in the Depth box enter 3.5 pt. Next to the Top list, in the Width box enter 5.5 pt. and in the Height box enter 9.5 pt. Under Bevel, in the Top list, under Bevel select Angle (second row, first option from the left). Also in the Format Shape dialog box, click 3-D Rotation in the left pane, and in the 3-D Rotation pane, under Rotation do the following: In the Z box enter 65.2°. In the Y box enter 298.9°. In the X box enter 297.8°. Also in the Format Shape dialog box, click Shadow in the left pane, and in the Shadow pane do the following: In the Blur box enter 15 pt. In the Size box enter 105%. In the Transparency box enter 60%. In the Angle box enter 120°. On the Home tab, in the Drawing group, click Shapes, and under Rectangles select Rounded Rectangle (second option from the left). On the slide, drag to draw a rounded rectangle. Select the circle and position towards the bottom of the slide. On the Home tab, in the Drawing group, click Arrange, and then under Position Objects, point to Align and select Align Center. In the Distance box enter 9 pt. Select the rectangle. Under Drawing Tools, on the Format tab, in the Size group, in the Shape Height box enter 4.2” and in the Shape Width box enter 0.18”. Drag the yellow adjustment diamond to the right to create a rounded top. In the Format Shape dialog box, in the left pane click Fill tab, and in the Fill pane do the following: On the Home tab, in the Drawing group, click the Format Shape dialog box launcher. Click Solid fill. Also in the Format Shape dialog box, in the left pane click 3-D Format, and in the 3-D Format pane do the following: Also in the Format Shape dialog box, in the left pane click Line Color, and in the Line Color tab click No line. In the Color list, under Theme Colors select White, Background 1, Darker 15% (third row, first option from the left). Under Bevel, in the Top list select Circle. Select the rounded rectangle. On the Home tab, in the Drawing group, click Arrange, and then under Position Objects, point to Align and select Align Center. Position the bottom of rectangle so that it slightly overlaps the oval. Next to the Top list, in the Width box enter 10 pt. and in the Height box enter 10 pt. Select the second rounded rectangle. Under Drawing Tools, on the Format tab, in the Size group, do the following: With the rounded rectangle still selected, on the Home tab, in the Clipboard group, click the arrow to the right of Copy, and then click Duplicate. In the Shape Width box enter 0.13”. In the Shape Height box enter 4.35”. With the second rounded rectangle still selected, on the Home tab, in the Drawing group, click Arrange, and then under Position Objects, point to Rotate and select Rotate Left 90°. Select the first (vertical) round rectangle. On the Home tab, in the Clipboard group, click the arrow to the right of Copy, and then click Duplicate. Select the second (horizontal) round rectangle. On the Home tab, in the Drawing group, click Arrange, under Position Objects, point to Align and select Align Center. Position the second (horizontal) round rectangle so that it slightly overlaps the top of the first, vertical round rectangle. Select the third (vertical) rounded rectangle. Under Drawing Tools, on the Format tab, in the Size group, do the following: Position the third, smaller round rectangle at the intersection at the top of the first (vertical) and second (horizontal) round rectangles. In the Shape Width box enter 0.32”. In the Shape Height box enter 0.32”. Select the third smaller round rectangle. On the Home tab, in the Drawing group, click Arrange, under Position Objects, point to Align and select Align Center. Select the second oval. Under Drawing Tools, on the Format tab, in the Size group, do the following: Select the oval. On the Home tab, in the Clipboard group, click the arrow to the right of Copy, and then click Duplicate. Press and hold SHIFT and select the second (horizontal) and third (smaller) round rectangles. On the Home tab, in the Drawing group, click Arrange, and under Group Objects select Group. In the Shape Height box enter 1.93”. On the Home tab, in the bottom right corner of the Drawing group, click the Format Shape dialog box launcher. On the Format Shape dialog box, click Fill in the left pane, and in the Fill pane do the following: In the Shape Width box enter 1.93”. Also in the Format Shape dialog box, click Shadow in the left pane, and in the Shadow pane, in the Presets list select No Shadow. Click the button next to Color, and then under Theme Colors select White, Background 1, Darker 15% (third row, first option from the left). Next to the Top list, in the Width box enter 5.5 pt and in the Height box enter 5 pt. Under Bevel, in the Top list, under Bevel, select Slope (second row, fourth option from the left). Next to the Bottom list, in the Width box enter 11 pt and in the Height box enter 5 pt. Under Bevel, in the Bottom list, under Bevel, select Angle (second row, the first option from the left). In the X box enter 287.8°. Position this oval (or dish) on the left side of the slide, approximately 2.5 inches below the horizontal round rectangle In the Z box enter 74.1°. In the Y box enter 297.1°. Select the line. On the Home tab, in bottom right corner of the Drawing group, click the Format Shape dialog box launcher. In the Format Shape dialog box, click Line Color in the left pane, and in the Line Color pane do the following: On the Home tab, in the Drawing group, click Shapes, and under Lines select Line (first option from the left). On the slide, drag to draw a line from left edge of the horizontal rectangle and to the bottom left edge of the dish. Click Solid line. Also in the Format Shape dialog box, click Line Style in the left pane, and in the Line Style pane do the following: In the Width box enter 3.75 pt. In the Join type list select Round. In the Cap type list select Round. In the Dash type list select Round Dot (second option). Select the line. On the Home tab, in the Clipboard group, click the arrow to the right of Copy, and then click Duplicate. On the Home tab, in the Drawing group, click Arrange, and then under Order Objects select Send to Back. Position duplicate line so the top point is at the same position as the top point on the first line. Position the end point is on the right edge of the dish. Select the second line. On the Home tab, in the Drawing group, click Arrange, and then under Position Objects, point to Rotate and select Flip Horizontal. Position the second group on the right side of the slide. Select the group of (the two dotted lines and the dish). On the Home tab, in the Clipboard group, click the arrow to the right of Copy, and then click Duplicate. Press and hold CTRL and select both lines and the dish. On the Home tab, in the Drawing group, click Arrange, and under Group Objects select Group. Press and hold CTRL and select both left and right groups. On the Home tab, in the Drawing group, click Arrange, and then do the following: Under Position Objects, point to Align and select Align Selected Objects. Under Order Objects select Send to Back. Under Position Objects, point to Align and select Align Top. To reproduce the animation effects on this slide, do the following: Also on the Animation tab, in the Animation group, click the Effect Options dialog box launcher. In the Spin dialog box, do the following: Select top horizontal bar group. On the Animations tab, in the Advanced Animation group, click Add Animation, and then under Emphasis click Spin. On the Effect tab, do the following: Also in the Amount list, select Clockwise. In the Amount list, in the Custom box enter 10 and press ENTER. Clear the Smooth Start box. On the Timing tab, do the following: Clear the Smooth End box. In the Speed list select Fast. Select the left dish group. Also on the Animations tab, in the Advanced Animation group, click Add Animation, and then click More Motion Paths. In the Add Motion Path dialog box, under Lines & Curves, click Up. Click OK. In the Start list select With Previous. Also on the Animations tab, in the Animation group, click the Effect Options dialog box launcher. In the Up dialog box, do the following: On the Timing tab, in the Start list, select With Previous, and then in the Speed list, select Fast. On the Effect tab, clear the Smooth Start and Smooth End boxes. Select the motion path on the slide. Press and hold the SHIFT key and drag the end point (red arrow) down to shorten the motion path (approximately .33” length). (Note: If needed, zoom in to see the objects. On the View tab, in the Zoom group, click Zoom, and in the Zoom dialog box, in the Percent box enter 200%. After editing, on the View tab, in the Zoom group click Fit to Window to return to the slide to its original size.) Select right dish group. Also on the Animations tab, in the Advanced Animation group, click Add Animation, and then click More Motion Paths. In the Add Motion Path dialog box, under Lines & Curves, click Down. Also on the Animations tab, in the Animation group, click the Effect Options dialog box launcher. In the Down dialog box, do the following: Select the down motion path on the slide. Press and hold SHIFT and the drag end point (red arrow) upwards to shorten path (approximately .33” length). Select the top horizontal bar group. On the Animations tab, in the Advanced Animation group, click Add Animation, and then under Emphasis click Spin. Also in the Amount list, select Counterclockwise. In the Amount list, in the Custom box enter 20 and press ENTER. Select the left dish group. Also on the Animations tab, in the Advanced Animation group, click Add Animation, and then click More Motion Paths. In the Add Motion Path dialog box, under Lines & Curves, click Down. Select the down motion path on the slide. Press and hold SHIFT and the drag end point (red arrow) upwards to shorten path (approximately .66” length). Select the Down motion path for the right dish on the slide. Press and hold SHIFT and drag the start point (green arrow) to meet end point (red arrow) from the first Up motion path. Select the right dish group. Also on the Animations tab, in the Advanced Animation group, click Add Animation, and then click More Motion Paths. In the Add Motion Path dialog box, under Lines & Curves, click Up. Select the motion path on the slide. Press and hold the SHIFT key and drag the end point (red arrow) down to shorten the motion path (approximately .66” length). Select the Up motion path for the right dish on the slide. Press and hold SHIFT and drag the start point (green arrow) to meet end point (red arrow) from the first Down motion path. To reproduce the background effects on this slide, do the following: In the Format Background dialog box, click Fill in the left pane, select Gradient fill in the right pane, and then do the following: Right-click the slide background area, and then click Format Background. Under Gradient stops, click Add gradient stops or Remove gradient stops until two stops appear in the slider. In the Direction list, click Linear Down (first row, second option from the left). In the Type list, select Linear. Also under Gradient stops, customize the gradient stops as follows: Select the first stop in the slider, and then do the following: Click the button next to Color, and then click under Theme Colors select White, Background 1 (first row, the first option from the left). In the Position box, enter 65%. Select second stop in the slider, and then do the following: Click the button next to Color, and then click under Theme Colors select Black, Text 1, Lighter 50% (second row, the second option from the left). In the Position box, enter 96%.
 To reproduce the shape effects on this slide, do the following: On the Home tab, in the Drawing group, click Shapes, and under Basic Shapes select Oval (first row, second option from the left). Press and hold SHIFT and on the slide, drag to draw a circle. On the Home tab, in the Slides group, click Layout, and then click Blank. Select the oval. Under Drawing Tools, on the Format tab, in the Size group, do the following: In the Shape Width box enter In the Shape Height box enter With the oval still selected, on the Home tab, in the bottom right corner of the Drawing group, click the Format Shape dialog box launcher. In the Format Shape dialog box, click Fill in the left pane, and in the Fill pane, do the following: Also in the Format Shape dialog box, click Line Color in the left pane, and in the Line Color pane click No line. Click the button next to Color, and then under Theme Colors select White, Background 1, Darker 25% (fourth row, first option from the left). Select Solid fill. Also in the Format Shape dialog box, click 3-D Format in the left pane, and in the 3-D Format pane do the following: Under Depth, in the Depth box enter 3.5 pt. Next to the Top list, in the Width box enter 5.5 pt. and in the Height box enter 9.5 pt. Under Bevel, in the Top list, under Bevel select Angle (second row, first option from the left). Also in the Format Shape dialog box, click 3-D Rotation in the left pane, and in the 3-D Rotation pane, under Rotation do the following: In the Z box enter 65.2°. In the Y box enter 298.9°. In the X box enter 297.8°. Also in the Format Shape dialog box, click Shadow in the left pane, and in the Shadow pane do the following: In the Blur box enter 15 pt. In the Size box enter 105%. In the Transparency box enter 60%. In the Angle box enter 120°. On the Home tab, in the Drawing group, click Shapes, and under Rectangles select Rounded Rectangle (second option from the left). On the slide, drag to draw a rounded rectangle. Select the circle and position towards the bottom of the slide. On the Home tab, in the Drawing group, click Arrange, and then under Position Objects, point to Align and select Align Center. In the Distance box enter 9 pt. Select the rectangle. Under Drawing Tools, on the Format tab, in the Size group, in the Shape Height box enter 4.2 and in the Shape Width box enter Drag the yellow adjustment diamond to the right to create a rounded top. In the Format Shape dialog box, in the left pane click Fill tab, and in the Fill pane do the following: On the Home tab, in the Drawing group, click the Format Shape dialog box launcher. Click Solid fill. Also in the Format Shape dialog box, in the left pane click 3-D Format, and in the 3-D Format pane do the following: Also in the Format Shape dialog box, in the left pane click Line Color, and in the Line Color tab click No line. In the Color list, under Theme Colors select White, Background 1, Darker 15% (third row, first option from the left). Under Bevel, in the Top list select Circle. Select the rounded rectangle. On the Home tab, in the Drawing group, click Arrange, and then under Position Objects, point to Align and select Align Center. Position the bottom of rectangle so that it slightly overlaps the oval. Next to the Top list, in the Width box enter 10 pt. and in the Height box enter 10 pt. Select the second rounded rectangle. Under Drawing Tools, on the Format tab, in the Size group, do the following: With the rounded rectangle still selected, on the Home tab, in the Clipboard group, click the arrow to the right of Copy, and then click Duplicate. In the Shape Width box enter In the Shape Height box enter With the second rounded rectangle still selected, on the Home tab, in the Drawing group, click Arrange, and then under Position Objects, point to Rotate and select Rotate Left 90°. Select the first (vertical) round rectangle. On the Home tab, in the Clipboard group, click the arrow to the right of Copy, and then click Duplicate. Select the second (horizontal) round rectangle. On the Home tab, in the Drawing group, click Arrange, under Position Objects, point to Align and select Align Center. Position the second (horizontal) round rectangle so that it slightly overlaps the top of the first, vertical round rectangle. Select the third (vertical) rounded rectangle. Under Drawing Tools, on the Format tab, in the Size group, do the following: Position the third, smaller round rectangle at the intersection at the top of the first (vertical) and second (horizontal) round rectangles. In the Shape Width box enter In the Shape Height box enter Select the third smaller round rectangle. On the Home tab, in the Drawing group, click Arrange, under Position Objects, point to Align and select Align Center. Select the second oval. Under Drawing Tools, on the Format tab, in the Size group, do the following: Select the oval. On the Home tab, in the Clipboard group, click the arrow to the right of Copy, and then click Duplicate. Press and hold SHIFT and select the second (horizontal) and third (smaller) round rectangles. On the Home tab, in the Drawing group, click Arrange, and under Group Objects select Group. In the Shape Height box enter On the Home tab, in the bottom right corner of the Drawing group, click the Format Shape dialog box launcher. On the Format Shape dialog box, click Fill in the left pane, and in the Fill pane do the following: In the Shape Width box enter Also in the Format Shape dialog box, click Shadow in the left pane, and in the Shadow pane, in the Presets list select No Shadow. Click the button next to Color, and then under Theme Colors select White, Background 1, Darker 15% (third row, first option from the left). Next to the Top list, in the Width box enter 5.5 pt and in the Height box enter 5 pt. Under Bevel, in the Top list, under Bevel, select Slope (second row, fourth option from the left). Next to the Bottom list, in the Width box enter 11 pt and in the Height box enter 5 pt. Under Bevel, in the Bottom list, under Bevel, select Angle (second row, the first option from the left). In the X box enter 287.8°. Position this oval (or dish) on the left side of the slide, approximately 2.5 inches below the horizontal round rectangle. In the Z box enter 74.1°. In the Y box enter 297.1°. Select the line. On the Home tab, in bottom right corner of the Drawing group, click the Format Shape dialog box launcher. In the Format Shape dialog box, click Line Color in the left pane, and in the Line Color pane do the following: On the Home tab, in the Drawing group, click Shapes, and under Lines select Line (first option from the left). On the slide, drag to draw a line from left edge of the horizontal rectangle and to the bottom left edge of the dish. Click Solid line. Also in the Format Shape dialog box, click Line Style in the left pane, and in the Line Style pane do the following: In the Width box enter 3.75 pt. In the Join type list select Round. In the Cap type list select Round. In the Dash type list select Round Dot (second option). Select the line. On the Home tab, in the Clipboard group, click the arrow to the right of Copy, and then click Duplicate. On the Home tab, in the Drawing group, click Arrange, and then under Order Objects select Send to Back. Position duplicate line so the top point is at the same position as the top point on the first line. Position the end point is on the right edge of the dish. Select the second line. On the Home tab, in the Drawing group, click Arrange, and then under Position Objects, point to Rotate and select Flip Horizontal. Position the second group on the right side of the slide. Select the group of (the two dotted lines and the dish). On the Home tab, in the Clipboard group, click the arrow to the right of Copy, and then click Duplicate. Press and hold CTRL and select both lines and the dish. On the Home tab, in the Drawing group, click Arrange, and under Group Objects select Group. Press and hold CTRL and select both left and right groups. On the Home tab, in the Drawing group, click Arrange, and then do the following: Under Position Objects, point to Align and select Align Selected Objects. Under Order Objects select Send to Back. Under Position Objects, point to Align and select Align Top. To reproduce the animation effects on this slide, do the following: Also on the Animation tab, in the Animation group, click the Effect Options dialog box launcher. In the Spin dialog box, do the following: Select top horizontal bar group. On the Animations tab, in the Advanced Animation group, click Add Animation, and then under Emphasis click Spin. On the Effect tab, do the following: Also in the Amount list, select Clockwise. In the Amount list, in the Custom box enter 10 and press ENTER. Clear the Smooth Start box. On the Timing tab, do the following: Clear the Smooth End box. In the Speed list select Fast. Select the left dish group. Also on the Animations tab, in the Advanced Animation group, click Add Animation, and then click More Motion Paths. In the Add Motion Path dialog box, under Lines & Curves, click Up. Click OK. In the Start list select With Previous. Also on the Animations tab, in the Animation group, click the Effect Options dialog box launcher. In the Up dialog box, do the following: On the Timing tab, in the Start list, select With Previous, and then in the Speed list, select Fast. On the Effect tab, clear the Smooth Start and Smooth End boxes. Select the motion path on the slide. Press and hold the SHIFT key and drag the end point (red arrow) down to shorten the motion path (approximately .33 length). (Note: If needed, zoom in to see the objects. On the View tab, in the Zoom group, click Zoom, and in the Zoom dialog box, in the Percent box enter 200%. After editing, on the View tab, in the Zoom group click Fit to Window to return to the slide to its original size.) Select right dish group. Also on the Animations tab, in the Advanced Animation group, click Add Animation, and then click More Motion Paths. In the Add Motion Path dialog box, under Lines & Curves, click Down. Also on the Animations tab, in the Animation group, click the Effect Options dialog box launcher. In the Down dialog box, do the following: Select the down motion path on the slide. Press and hold SHIFT and the drag end point (red arrow) upwards to shorten path (approximately .33 length). Select the top horizontal bar group. On the Animations tab, in the Advanced Animation group, click Add Animation, and then under Emphasis click Spin. Also in the Amount list, select Counterclockwise. In the Amount list, in the Custom box enter 20 and press ENTER. Select the left dish group. Also on the Animations tab, in the Advanced Animation group, click Add Animation, and then click More Motion Paths. In the Add Motion Path dialog box, under Lines & Curves, click Down. Select the down motion path on the slide. Press and hold SHIFT and the drag end point (red arrow) upwards to shorten path (approximately .66 length). Select the Down motion path for the right dish on the slide. Press and hold SHIFT and drag the start point (green arrow) to meet end point (red arrow) from the first Up motion path. Select the right dish group. Also on the Animations tab, in the Advanced Animation group, click Add Animation, and then click More Motion Paths. In the Add Motion Path dialog box, under Lines & Curves, click Up. Select the motion path on the slide. Press and hold the SHIFT key and drag the end point (red arrow) down to shorten the motion path (approximately .66 length). Select the Up motion path for the right dish on the slide. Press and hold SHIFT and drag the start point (green arrow) to meet end point (red arrow) from the first Down motion path. To reproduce the background effects on this slide, do the following: In the Format Background dialog box, click Fill in the left pane, select Gradient fill in the right pane, and then do the following: Right-click the slide background area, and then click Format Background. Under Gradient stops, click Add gradient stops or Remove gradient stops until two stops appear in the slider. In the Direction list, click Linear Down (first row, second option from the left). In the Type list, select Linear. Also under Gradient stops, customize the gradient stops as follows: Select the first stop in the slider, and then do the following: Click the button next to Color, and then click under Theme Colors select White, Background 1 (first row, the first option from the left). In the Position box, enter 65%. Select second stop in the slider, and then do the following: Click the button next to Color, and then click under Theme Colors select Black, Text 1, Lighter 50% (second row, the second option from the left). In the Position box, enter 96%.")
Apresentações semelhantes