Carregar apresentação
A apresentação está carregando. Por favor, espere

1
ABORDAGEM SISTÊMICA SOBRE CAPTAÇÃO DE RECURSOS FEDERAIS E GESTÃO DE CONVÊNIOS
Manaus/AM 2013

2
••••••••••••••••••••••••••••••••••
Quem sou eu? •••••••••••••••••••••••••••••••••• Léia Neri Licenciada em Pedagogia B.ela em Adm. de Empresas e em Administração Pública Esp. em Marketing Empresarial e de Relacionamento MSc. em Liderança Estratégica e MSc. em Estratégia Organizacional Ex-diretora de Projetos e Gestão da SEJUS/AM Consultora em projetos e captação de recursos federais, nacionais e internacionais da Fundação Muraki Membro da Associação Brasileira de Captadores de Recursos Larga experiência em elaboração de projetos, captação de recursos, gestão de convênios e prestação de contas (17 estados) Custom animation effects: dotted line with text fade by letter (Basic) To reproduce the text effects on this slide, do the following: On the Home tab, in the Slides group, click Layout, and then click Blank. On the Insert tab, in the Text group, click Text Box, and then on the slide, drag to draw a text box that spans the entire width of the slide. On the Insert tab, in the Text group, click Symbol. In the Symbol dialog box, do the following: In the Font list, select (normal text). In the Subset list, select General Punctuation. In the Character Code box, enter 2022 to select BULLET, and then click Insert. Click Insert 33 more times until there is a row of 34 bullets in the text box. In the text box, select the text, and then on the Home tab, in the Font group do the following: In the Font list, select Arial Black. In the Font Size list, select 44. Click the arrow next to Font Color, and then under Theme Colors click White, Background 1 (first row, first option from the left). On the Home tab, in the Drawing group, click Arrange, point to Align, and then do the following: Click Align to Slide. Click Align Center. Click Align Middle. On the Insert tab, in the Text group, click Text Box. Drag to draw a text box on the slide. Enter and select the text. On the Home tab, in the Font group, do the following: In the Font list, select Corbel. In the Font Size box, enter 50. Click Bold. With the text still selected, on the Home tab, in the Paragraph group, click Center. Select the second text box. On the Home tab, in the Drawing group, click Arrange, point to Align, and then do the following: To reproduce the background effects on this slide, do the following: Right-click the slide background area, and then click Format Background. In the Format Background dialog box, click Fill in the left pane, select Gradient fill in the Fill pane, and then do the following: In the Type list, select Radial. Click the button next to Direction, and then click From Center (third option from the left). Under Gradient stops, click Add or Remove until two stops appear in the drop-down list. Also under Gradient stops, customize the gradient stops that you added as follows: Select Stop 1 from the list, and then do the following: In the Stop position box, enter 0%. Click the button next to Color, and then under Theme Colors select Blue, Accent 1, Darker 25% (fifth row, fifth option from the left). Select Stop 2 from the list, and then do the following: In the Stop position box, enter 100%. Click the button next to Color, and then under Theme Colors select Black, Text 1 (first row, second option from the left). To reproduce the animation effects on this slide, do the following: On the Animations tab, in the Animations group, click Custom Animation. On the slide, select the first text box. In the Custom Animation task pane, do the following: Click Add Effect, point to Entrance, and then click More Effects. In the Add Entrance Effect dialog box, under Basic, click Fly In. Select the animation effect (fly-in effect for the first text box). Click the arrow to the right of the selected effect, and then click Effect Options. In the Fly In dialog box, do the following: On the Effect tab, do the following: In the Direction list, select From Left. In the Animate text list, select By Letter. In the % delay between letters box, enter 10. On the Timing tab, do the following: In the Start list, select With Previous. In the Speed list, select 0.5 seconds (Very Fast). Click Add Effect, point to Exit, and then click More Effects. In the Add Exit Effect dialog box, under Subtle, click Fade. Select the second animation effect (fade effect for the first text box). Click the arrow to the right of the selected effect, and then click Effect Options. In the Fade dialog box, do the following: In the Delay box, enter 1.5. On the slide, select the second text box. In the Custom Animation task pane, do the following. Click Add Effect, point to Entrance, and then click More Effects. In the Add Entrance Effect dialog box, under Subtle, click Fade. Select the third animation effect (fade effect for the second text box). Click the arrow to the right of the selected effect, and then click Effect Options. In the Fade dialog box, do the following: In the % delay between letters box, enter 6. In the Delay box, enter 2. Fone: / Facebook: Léia Neri Website:
 Custom animation effects: dotted line with text fade by letter. (Basic) To reproduce the text effects on this slide, do the following: On the Home tab, in the Slides group, click Layout, and then click Blank. On the Insert tab, in the Text group, click Text Box, and then on the slide, drag to draw a text box that spans the entire width of the slide. On the Insert tab, in the Text group, click Symbol. In the Symbol dialog box, do the following: In the Font list, select (normal text). In the Subset list, select General Punctuation. In the Character Code box, enter 2022 to select BULLET, and then click Insert. Click Insert 33 more times until there is a row of 34 bullets in the text box. In the text box, select the text, and then on the Home tab, in the Font group do the following: In the Font list, select Arial Black. In the Font Size list, select 44. Click the arrow next to Font Color, and then under Theme Colors click White, Background 1 (first row, first option from the left). On the Home tab, in the Drawing group, click Arrange, point to Align, and then do the following: Click Align to Slide. Click Align Center. Click Align Middle. On the Insert tab, in the Text group, click Text Box. Drag to draw a text box on the slide. Enter and select the text. On the Home tab, in the Font group, do the following: In the Font list, select Corbel. In the Font Size box, enter 50. Click Bold. With the text still selected, on the Home tab, in the Paragraph group, click Center. Select the second text box. On the Home tab, in the Drawing group, click Arrange, point to Align, and then do the following: To reproduce the background effects on this slide, do the following: Right-click the slide background area, and then click Format Background. In the Format Background dialog box, click Fill in the left pane, select Gradient fill in the Fill pane, and then do the following: In the Type list, select Radial. Click the button next to Direction, and then click From Center (third option from the left). Under Gradient stops, click Add or Remove until two stops appear in the drop-down list. Also under Gradient stops, customize the gradient stops that you added as follows: Select Stop 1 from the list, and then do the following: In the Stop position box, enter 0%. Click the button next to Color, and then under Theme Colors select Blue, Accent 1, Darker 25% (fifth row, fifth option from the left). Select Stop 2 from the list, and then do the following: In the Stop position box, enter 100%. Click the button next to Color, and then under Theme Colors select Black, Text 1 (first row, second option from the left). To reproduce the animation effects on this slide, do the following: On the Animations tab, in the Animations group, click Custom Animation. On the slide, select the first text box. In the Custom Animation task pane, do the following: Click Add Effect, point to Entrance, and then click More Effects. In the Add Entrance Effect dialog box, under Basic, click Fly In. Select the animation effect (fly-in effect for the first text box). Click the arrow to the right of the selected effect, and then click Effect Options. In the Fly In dialog box, do the following: On the Effect tab, do the following: In the Direction list, select From Left. In the Animate text list, select By Letter. In the % delay between letters box, enter 10. On the Timing tab, do the following: In the Start list, select With Previous. In the Speed list, select 0.5 seconds (Very Fast). Click Add Effect, point to Exit, and then click More Effects. In the Add Exit Effect dialog box, under Subtle, click Fade. Select the second animation effect (fade effect for the first text box). Click the arrow to the right of the selected effect, and then click Effect Options. In the Fade dialog box, do the following: In the Delay box, enter 1.5. On the slide, select the second text box. In the Custom Animation task pane, do the following. Click Add Effect, point to Entrance, and then click More Effects. In the Add Entrance Effect dialog box, under Subtle, click Fade. Select the third animation effect (fade effect for the second text box). Click the arrow to the right of the selected effect, and then click Effect Options. In the Fade dialog box, do the following: In the % delay between letters box, enter 6. In the Delay box, enter 2. Fone: / Facebook: Léia Neri. Website:")
3
O que vamos fazer? Módulo 1 – Captação de recursos
Módulo 2 – Recursos da União para municípios Módulo 3 – Captando recursos do Governo Federal Módulo 4 – Elaboração de Projetos – Roteiro Básico Módulo 5 – Execução de Convênios e Prestação de Contas Custom animation effects: title fade-in on path and text fade by letter (Intermediate) Tip: For the effects on this slide, use a picture that measures 7.5” high (the height of the slide) and 2.61” wide. To reproduce the shape effects on this slide, do the following: On the Home tab, in the Drawing group, click Shapes, and then under Rectangles click Rectangle (first option from the left). On the slide, drag to draw a rectangle. Select the rectangle. Under Drawing Tools, on the Format tab, in the Size group, do the following: In the Shape Height box, enter 3.17”. In the Shape Width box, enter 9.5”. Drag the rectangle slightly above the middle of the slide. Select the rectangle. On the Home tab, in the Drawing group, click Arrange, point to Align, and then do the following: Click Align to Slide. Click Align Left. Under Drawing Tools, on the Format tab, in the Shape Styles group, click the next to Shape Outline, and then click No Outline. Under Drawing Tools, on the Format tab, in the bottom right corner of the Shape Styles group, click the Format Shape dialog box launcher. In the Format Shape dialog box, click Fill in the left pane, select Gradient fill in the Fill pane, and then do the following: In the Type list, select Linear. Click the button next to Direction, and then click Linear Right (first row, fourth option from the left). Under Gradient stops, click Add or Remove until two stops appear in the drop-down list. Also under Gradient stops, customize the gradient stops that you added as follows: Select Stop 1 from the list, and then do the following: In the Stop position box, enter 0%. Click the button next to Color, and then under Theme Colors click Orange, Accent 6, Darker 50% (fifth row, 10th option from the left). Select Stop 2 from the list, and then do the following: In the Stop position box, enter 100%. Click the button next to Color, and then under Theme Colors click Orange, Accent 6, Darker 25% (fourth row, 10th option from the left). To reproduce the “heading” text box on this slide, do the following: On the Insert tab, in the Text group, select Text Box. On the slide, drag to draw a text box. Enter the heading text, and then select text. On the Home tab, in the Font group, do the following: In the Font list, select Calibri. In the Font Size box, enter 38. Click Bold. Click the arrow next to Font Color, and then under Theme Colors click Orange, Accent 6, Darker 25% (fourth row, 10th option from the left). On the Home tab, in the Paragraph group, click Align Text Left. Drag the text box just above the rectangle, in the right half of the slide. To reproduce the second text box on this slide, do the following: On the Insert tab, in the Text group, click Text Box. On the slide, drag to draw a text box. Enter three lines of text with paragraph breaks, and then select the text. On the Home tab, in the Font group, do the following: In the Font Size list, select 28. Click the arrow next to Font Color, and then under Theme Colors click White, Background 1 (first row, first option from the left). Drag the second text box onto the rectangle, below the “heading” text box. To reproduce the full-color picture on this slide, do the following: On the Home tab, in the Slides group, click Layout, and then click Blank. On the Insert tab, in the Illustrations group, click Picture. In the Insert Picture dialog box, select the 7.5” x 2.61” picture, and then click Insert. On the slide, select the picture. Under Picture Tools, on the Format tab, in the bottom right corner of the Size group, click the Size and Position dialog box launcher. In the Size and Position dialog box, on the Size tab, under Crop from, in the Bottom box, enter 2.43”. (Note: Under Size and rotate, the Height should now be 5.08”.) On the slide, select the picture. Under Picture Tools, on the Format tab, in the Picture Styles group, click Picture Effects, point to Glow, and then under Glow Variations click Accent color 1, 5 pt glow (first row, first option from the left). Also under Picture Tools, on the Format tab, in the Picture Styles group, click Picture Effects, point to Glow, point to More Glow Colors, and then under Theme Colors click White, Background 1 (first row, first option from the left). Drag the full-color picture on top of the rectangle, to the left of the text boxes. On the Home tab, in the Drawing group, click Arrange, point to Align, and then do the following: Click Align Top. To reproduce the second picture on this slide, do the following: On the Insert tab, in the Illustrations group, click Picture. In the Insert Picture dialog box, select the same 7.5” x 2.61” picture, and then click Insert. On the slide, select the picture. Under Picture Tools, on the Format tab, in the bottom right corner of the Size group, click the Size and Position dialog box launcher. In the Size and Position dialog box, on the Size tab, under Crop from, in the Top box, enter 5.08”. (Note: Under Size and rotate, the Height should now be 2.43”.) On the slide, select the second, smaller picture. Under Picture Tools, on the Format tab, in the Picture Styles group, click the Format Shape dialog box launcher. In the Format Picture dialog box, click Picture in the left pane, and in the Picture pane do the following: In the Brightness box, enter 70%. In the Contrast box, enter -70%. On the slide, drag the smaller picture until it is directly underneath the larger full-color picture. Select the smaller picture. On the Home tab, in the Drawing group, click Arrange, point to Align, and then do the following: Click Align Bottom. Press and hold CTRL, and then select both pictures. On the Home tab, in the Drawing group, click Arrange, point to Align, and then do the following: Click Align Selected Objects. Click Align Center. To reproduce the animation effects on this slide, do the following: On the Animations tab, in the Animations group, click Custom Animation. On the slide, select the “heading” text box. In the Custom Animation task pane, do the following: Click Add Effect, point to Entrance, and then click More Effects. In the Add Entrance Effect dialog box, under Subtle, click Fade. Select the animation effect (fade effect for the “heading” text box). Click the arrow to the right of the selected text box, and then click Timing. In the Fade dialog box, on the Timing tab, do the following: In the Start list, select With Previous. In the Delay box, enter 1.5. In the Speed list, select 2 seconds (Medium). Click Add Effect, point to Motion Paths, and then click Left. Select the second animation effect (left motion path for the “heading” text box). Under Modify: Left, do the following: In the Speed list, select Medium. On the slide, right-click the left motion path and click Reverse Path Direction. With the motion path still selected, point to the starting point (green arrow) of the motion path until the cursor becomes a two-headed arrow. Press and hold SHIFT, and then drag the starting point about 1.5” off the left edge of the slide. (Note: It may help to display the ruler. On the View tab, in the Show/Hide group, select Ruler. If your lines of text are longer than in the example above, you may need to further increase the length of the motion path. ) On the slide, select the second text box. In the Custom Animation task pane, do the following: Select the third animation effect (fade effect for the second text box). Click the arrow to the right of the selected effect, and then click Effect Options. In the Fade dialog box, do the following: On the Effect tab, do the following: In the Animate text list, select By Letter. In the % delay between letters box, enter 5. On the Timing tab, do the following: In the Start list, select After Previous. In the Speed list, select 0.5 seconds (Very Fast). On the Text Animation tab, in the Group text list, select By 1st Level Paragraphs. To reproduce the background on this slide, do the following: Right-click the slide background area, and then click Format Background. In the Format Background dialog box, click Fill in the left pane, select Gradient fill in the Fill pane, and then do the following: In the Type list, select Radial. Click the button next to Direction, and then click From Center (third option from the left). Under Gradient stops, click Add or Remove until three stops appear in the drop-down list. Click the button next to Color, and then under Theme Colors click White, Background 1 (first row, first option from the left). In the Stop position box, enter 40%. Select Stop 3 from the list, and then do the following: Click the button next to Color, click More Colors, and then in the Colors dialog box, on the Custom tab, enter values for Red: 232, Green: 227, and Blue: 216.
 Tip: For the effects on this slide, use a picture that measures 7.5 high (the height of the slide) and 2.61 wide. To reproduce the shape effects on this slide, do the following: On the Home tab, in the Drawing group, click Shapes, and then under Rectangles click Rectangle (first option from the left). On the slide, drag to draw a rectangle. Select the rectangle. Under Drawing Tools, on the Format tab, in the Size group, do the following: In the Shape Height box, enter In the Shape Width box, enter Drag the rectangle slightly above the middle of the slide. Select the rectangle. On the Home tab, in the Drawing group, click Arrange, point to Align, and then do the following: Click Align to Slide. Click Align Left. Under Drawing Tools, on the Format tab, in the Shape Styles group, click the next to Shape Outline, and then click No Outline. Under Drawing Tools, on the Format tab, in the bottom right corner of the Shape Styles group, click the Format Shape dialog box launcher. In the Format Shape dialog box, click Fill in the left pane, select Gradient fill in the Fill pane, and then do the following: In the Type list, select Linear. Click the button next to Direction, and then click Linear Right (first row, fourth option from the left). Under Gradient stops, click Add or Remove until two stops appear in the drop-down list. Also under Gradient stops, customize the gradient stops that you added as follows: Select Stop 1 from the list, and then do the following: In the Stop position box, enter 0%. Click the button next to Color, and then under Theme Colors click Orange, Accent 6, Darker 50% (fifth row, 10th option from the left). Select Stop 2 from the list, and then do the following: In the Stop position box, enter 100%. Click the button next to Color, and then under Theme Colors click Orange, Accent 6, Darker 25% (fourth row, 10th option from the left). To reproduce the heading text box on this slide, do the following: On the Insert tab, in the Text group, select Text Box. On the slide, drag to draw a text box. Enter the heading text, and then select text. On the Home tab, in the Font group, do the following: In the Font list, select Calibri. In the Font Size box, enter 38. Click Bold. Click the arrow next to Font Color, and then under Theme Colors click Orange, Accent 6, Darker 25% (fourth row, 10th option from the left). On the Home tab, in the Paragraph group, click Align Text Left. Drag the text box just above the rectangle, in the right half of the slide. To reproduce the second text box on this slide, do the following: On the Insert tab, in the Text group, click Text Box. On the slide, drag to draw a text box. Enter three lines of text with paragraph breaks, and then select the text. On the Home tab, in the Font group, do the following: In the Font Size list, select 28. Click the arrow next to Font Color, and then under Theme Colors click White, Background 1 (first row, first option from the left). Drag the second text box onto the rectangle, below the heading text box. To reproduce the full-color picture on this slide, do the following: On the Home tab, in the Slides group, click Layout, and then click Blank. On the Insert tab, in the Illustrations group, click Picture. In the Insert Picture dialog box, select the 7.5 x 2.61 picture, and then click Insert. On the slide, select the picture. Under Picture Tools, on the Format tab, in the bottom right corner of the Size group, click the Size and Position dialog box launcher. In the Size and Position dialog box, on the Size tab, under Crop from, in the Bottom box, enter (Note: Under Size and rotate, the Height should now be ) On the slide, select the picture. Under Picture Tools, on the Format tab, in the Picture Styles group, click Picture Effects, point to Glow, and then under Glow Variations click Accent color 1, 5 pt glow (first row, first option from the left). Also under Picture Tools, on the Format tab, in the Picture Styles group, click Picture Effects, point to Glow, point to More Glow Colors, and then under Theme Colors click White, Background 1 (first row, first option from the left). Drag the full-color picture on top of the rectangle, to the left of the text boxes. On the Home tab, in the Drawing group, click Arrange, point to Align, and then do the following: Click Align Top. To reproduce the second picture on this slide, do the following: On the Insert tab, in the Illustrations group, click Picture. In the Insert Picture dialog box, select the same 7.5 x 2.61 picture, and then click Insert. On the slide, select the picture. Under Picture Tools, on the Format tab, in the bottom right corner of the Size group, click the Size and Position dialog box launcher. In the Size and Position dialog box, on the Size tab, under Crop from, in the Top box, enter (Note: Under Size and rotate, the Height should now be ) On the slide, select the second, smaller picture. Under Picture Tools, on the Format tab, in the Picture Styles group, click the Format Shape dialog box launcher. In the Format Picture dialog box, click Picture in the left pane, and in the Picture pane do the following: In the Brightness box, enter 70%. In the Contrast box, enter -70%. On the slide, drag the smaller picture until it is directly underneath the larger full-color picture. Select the smaller picture. On the Home tab, in the Drawing group, click Arrange, point to Align, and then do the following: Click Align Bottom. Press and hold CTRL, and then select both pictures. On the Home tab, in the Drawing group, click Arrange, point to Align, and then do the following: Click Align Selected Objects. Click Align Center. To reproduce the animation effects on this slide, do the following: On the Animations tab, in the Animations group, click Custom Animation. On the slide, select the heading text box. In the Custom Animation task pane, do the following: Click Add Effect, point to Entrance, and then click More Effects. In the Add Entrance Effect dialog box, under Subtle, click Fade. Select the animation effect (fade effect for the heading text box). Click the arrow to the right of the selected text box, and then click Timing. In the Fade dialog box, on the Timing tab, do the following: In the Start list, select With Previous. In the Delay box, enter 1.5. In the Speed list, select 2 seconds (Medium). Click Add Effect, point to Motion Paths, and then click Left. Select the second animation effect (left motion path for the heading text box). Under Modify: Left, do the following: In the Speed list, select Medium. On the slide, right-click the left motion path and click Reverse Path Direction. With the motion path still selected, point to the starting point (green arrow) of the motion path until the cursor becomes a two-headed arrow. Press and hold SHIFT, and then drag the starting point about 1.5 off the left edge of the slide. (Note: It may help to display the ruler. On the View tab, in the Show/Hide group, select Ruler. If your lines of text are longer than in the example above, you may need to further increase the length of the motion path. ) On the slide, select the second text box. In the Custom Animation task pane, do the following: Select the third animation effect (fade effect for the second text box). Click the arrow to the right of the selected effect, and then click Effect Options. In the Fade dialog box, do the following: On the Effect tab, do the following: In the Animate text list, select By Letter. In the % delay between letters box, enter 5. On the Timing tab, do the following: In the Start list, select After Previous. In the Speed list, select 0.5 seconds (Very Fast). On the Text Animation tab, in the Group text list, select By 1st Level Paragraphs. To reproduce the background on this slide, do the following: Right-click the slide background area, and then click Format Background. In the Format Background dialog box, click Fill in the left pane, select Gradient fill in the Fill pane, and then do the following: In the Type list, select Radial. Click the button next to Direction, and then click From Center (third option from the left). Under Gradient stops, click Add or Remove until three stops appear in the drop-down list. Click the button next to Color, and then under Theme Colors click White, Background 1 (first row, first option from the left). In the Stop position box, enter 40%. Select Stop 3 from the list, and then do the following: Click the button next to Color, click More Colors, and then in the Colors dialog box, on the Custom tab, enter values for Red: 232, Green: 227, and Blue: 216.")
4
MÓDULO 1 – CAPTAÇÃO DE RECURSOS
O QUE É, O QUE NÃO É Captar recursos? Moda nos anos 90 Organizações sem fins lucrativos Finalidades sociais Serviços de consultoria Atuação do Governo Federal SICONV 1.1 Entendendo a captação de recursos: aspectos conceituais 1.2 Quem pode captar recursos? 1.3 Status dos municípios 1980 1990 2000 2008 2013 Modismo necessidades SICONV Recursos Federais

5
MÓDULO 1 – CAPTAÇÃO DE RECURSOS
QUE TIPO DE RECURSOS? MATERIAIS HUMANOS RECURSOS PARA PROJETOS 1.1 Entendendo a captação de recursos: aspectos conceituais 1.2 Quem pode captar recursos? 1.3 Status dos municípios

6
MÓDULO 1 – CAPTAÇÃO DE RECURSOS
QUE TIPO DE RECURSOS? RECURSOS MATERIAIS 1.1 Entendendo a captação de recursos: aspectos conceituais 1.2 Quem pode captar recursos? 1.3 Status dos municípios $$$$$$$$$$$$$$$$$$$$$$$$

7
MÓDULO 1 – CAPTAÇÃO DE RECURSOS
QUE TIPO DE RECURSOS? RECURSOS HUMANOS 1.1 Entendendo a captação de recursos: aspectos conceituais 1.2 Quem pode captar recursos? 1.3 Status dos municípios

8
MÓDULO 1 – CAPTAÇÃO DE RECURSOS
1.1 Entendendo a captação de recursos: aspectos conceituais 1.2 Quem pode captar recursos? 1.3 Status dos municípios CAPTAÇÃO = MOBILIZAÇÃO DE RECURSOS Termo utilizado para descrever um leque de atividades de geração de recursos realizadas por instituições públicas ou privadas, em apoio à sua finalidade principal, independente da fonte ou do método utilizado para gerá-los.

9
MÓDULO 1 – CAPTAÇÃO DE RECURSOS
PERFIL DA ORGANIZAÇÃO Define modo de atuação Serviços Assistência Social Saúde Educação Tecnologia Infraestrutura Direitos Humanos Outros Ajuda a identificar possíveis fontes de recursos 1.1 Entendendo a captação de recursos: aspectos conceituais 1.2 Quem pode captar recursos? 1.3 Status dos municípios

10
MÓDULO 1 – CAPTAÇÃO DE RECURSOS
POR QUE CAPTAR RECURSOS? Financiamentos podem significar valores relativamente altos O dinheiro está DISPONÍVEL 1.1 Entendendo a captação de recursos: aspectos conceituais 1.2 Quem pode captar recursos? 1.3 Status dos municípios

14
MÓDULO 1 – CAPTAÇÃO DE RECURSOS
Mais PUBLICIDADE ao trabalho desenvolvido pela organização 1.1 Entendendo a captação de recursos: aspectos conceituais 1.2 Quem pode captar recursos? 1.3 Status dos municípios Ampliação da base social Alcance de mais pessoas Credibilidade Alavanca ações

15
MÓDULO 1 – CAPTAÇÃO DE RECURSOS
MOBILIZAÇÃO DE RECURSOS EMPREENDER CAPTAR RECURSOS INOVAR 1.1 Entendendo a captação de recursos: aspectos conceituais 1.2 Quem pode captar recursos? 1.3 Status dos municípios Não diz respeito apenas a assegurar recursos novos ou adicionais, mas também à OTIMIZAÇÃO (como fazer melhor uso) dos recursos existentes, à conquista de NOVAS PARCERIAS e à obtenção de FONTES ALTERNATIVAS de recursos financeiros.
 dos recursos existentes, à conquista de NOVAS PARCERIAS e à obtenção de FONTES ALTERNATIVAS de recursos financeiros.")
16
MÓDULO 1 – CAPTAÇÃO DE RECURSOS
UMA OUTRA FORMA DE PENSAR Empreender ou não empreender: eis a questão 1.1 Entendendo a captação de recursos: aspectos conceituais 1.2 Quem pode captar recursos? 1.3 Status dos municípios

17
MÓDULO 1 – CAPTAÇÃO DE RECURSOS
QUESTÕES ÉTICAS Alinhamento institucional Incentivo e motivação dos envolvidos Compromentimento do gestor Como e com quem buscar recursos? 1.1 Entendendo a captação de recursos: aspectos conceituais 1.2 Quem pode captar recursos? 1.3 Status dos municípios

18
MÓDULO 1 – CAPTAÇÃO DE RECURSOS
QUEM PRESTA CONTAS PARA QUEM? 1.1 Entendendo a captação de recursos: aspectos conceituais 1.2 Quem pode captar recursos? 1.3 Status dos municípios

19
MÓDULO 1 – CAPTAÇÃO DE RECURSOS
COM QUEM CAPTAR RECURSOS? Governo Federal Governo Estadual Empresas privadas Instituições de fomento Fundos nacionais e internacionais 1.1 Entendendo a captação de recursos: aspectos conceituais 1.2 Quem pode captar recursos? 1.3 Status dos municípios Onde mais?

20
MÓDULO 1 – CAPTAÇÃO DE RECURSOS
O ONDE E O COMO 1.1 Entendendo a captação de recursos: aspectos conceituais 1.2 Quem pode captar recursos? 1.3 Status dos municípios Justificativa Liderança Pesquisa por fontes de recursos PROGRAMA DE CAPTAÇÃO

21
MÓDULO 1 – CAPTAÇÃO DE RECURSOS
REGRAS BÁSICAS DA CAPTAÇÃO DE RECURSOS 1.1 Entendendo a captação de recursos: aspectos conceituais 1.2 Quem pode captar recursos? 1.3 Status dos municípios LEMBRE-SE: PEÇA PESSOAS QUEREM AJUDAR SAIBA O QUE VOCÊ QUER LIDERANÇA NETWORK PLANEJE SEMPRE

22
MÓDULO 1 – CAPTAÇÃO DE RECURSOS
PRINCÍPIO VIC Utilizado para determinar prováveis FONTES DE RECURSOS 1.1 Entendendo a captação de recursos: aspectos conceituais 1.2 Quem pode captar recursos? 1.3 Status dos municípios VÍNCULO INTERESSE CAPACIDADE

23
MÓDULO 1 – CAPTAÇÃO DE RECURSOS
PIRÂMIDE DA CAPTAÇÃO DE RECURSOS 1.1 Entendendo a captação de recursos: aspectos conceituais 1.2 Quem pode captar recursos? 1.3 Status dos municípios AÇÕES PLANEJADAS GRANDES AÇÕES AÇÕES PROGRAMADAS PRIMEIRA CAPTAÇÃO CONTATO INICIAL

24
CAPTAR RECURSOS PROCESSO e não um evento

25
CICLO DA CAPTAÇÃO DE RECURSOS

26
MÓDULO 1 – CAPTAÇÃO DE RECURSOS
SÍNTESE DO PROCESSO DE CAPTAÇÃO 1.1 Entendendo a captação de recursos: aspectos conceituais 1.2 Quem pode captar recursos? 1.3 Status dos municípios Emílio Carlos Morais Martos Associação Comunidade de Mãos Dadas, Santos-SP “Em Santos, na Associação Comunidade de Mãos Dadas, começamos a utilizar o ciclo para organizar nosso processo de captação de recursos no início de Ou seja: fizemos a análise da organização (ambiente interno e externo), o planejamento das ações, a pesquisa dos financiadores, o cultivo e a educação, a apresentação de propostas e o agradecimento. Em cada ação foi utilizada um estratégia específica, de acordo com a necessidade e o financiador. Acredito que o CICLO sintetiza todo o processo de captação”.
, o planejamento das ações, a pesquisa dos financiadores, o cultivo e a educação, a apresentação de propostas e o agradecimento. Em cada ação foi utilizada um estratégia específica, de acordo com a necessidade e o financiador. Acredito que o CICLO sintetiza todo o processo de captação .")
27
MÓDULO 1 – CAPTAÇÃO DE RECURSOS
QUEM PODE CAPTAR? 1.1 Entendendo a captação de recursos: aspectos conceituais 1.2 Quem pode captar recursos? 1.3 Status dos municípios Pesquisadores Estudantes Profissionais (liberais ou não) PESSOA FÍSICA Empresas privadas ONGs Organizações públicas PESSOA JURÍDICA
 PESSOA FÍSICA. Empresas privadas. ONGs. Organizações públicas. PESSOA JURÍDICA.")
28
MÓDULO 1 – CAPTAÇÃO DE RECURSOS
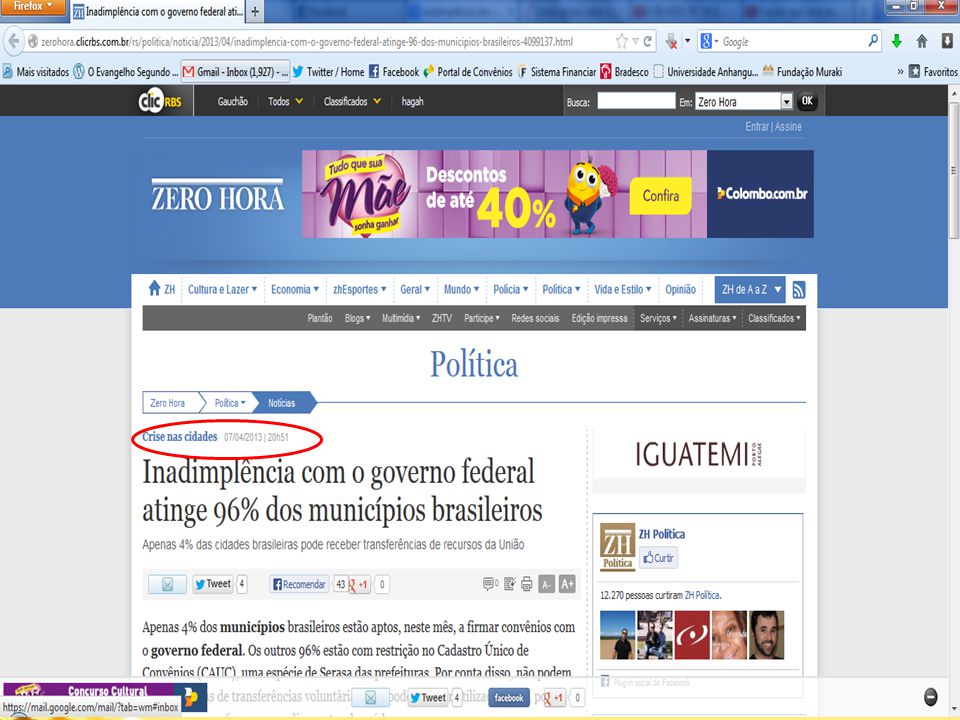
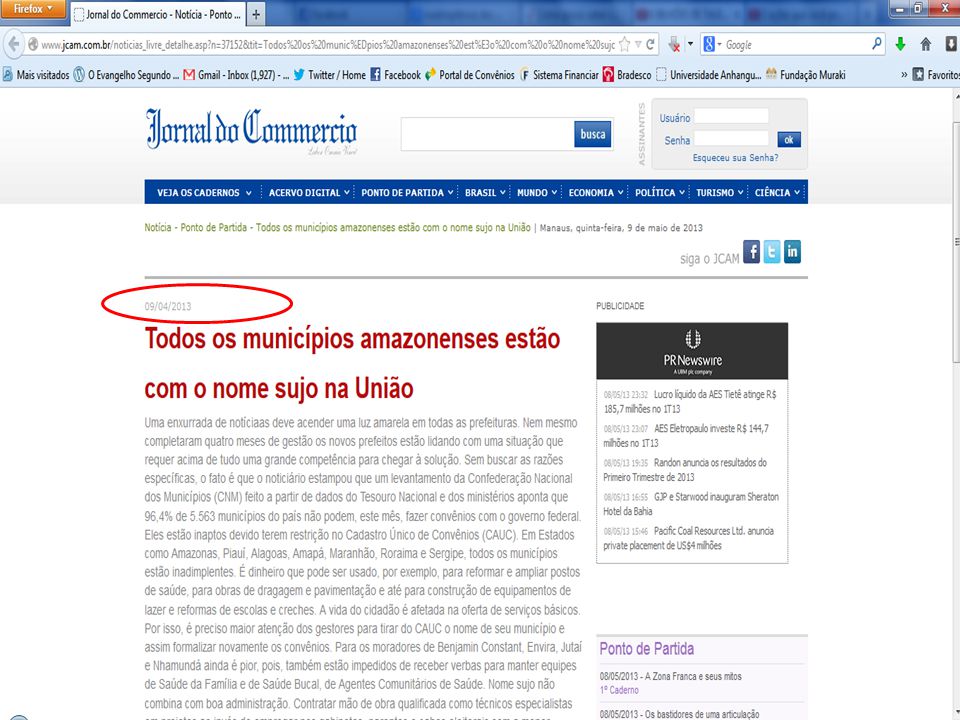
STATUS DOS MUNICÍPIOS 1.1 Entendendo a captação de recursos: aspectos conceituais 1.2 Quem pode captar recursos? 1.3 Status dos municípios

30
MÓDULO 1 – CAPTAÇÃO DE RECURSOS
STATUS DOS MUNICÍPIOS 1.1 Entendendo a captação de recursos: aspectos conceituais 1.2 Quem pode captar recursos? 1.3 Status dos municípios

33
MÓDULO 1 – CAPTAÇÃO DE RECURSOS
STATUS DOS MUNICÍPIOS Como posso saber se meu município está inadimplente com o Governo Federal? 1.1 Entendendo a captação de recursos: aspectos conceituais 1.2 Quem pode captar recursos? 1.3 Status dos municípios A consulta da situação do município pode ser feita pelo Cadastro Único de Convênios (CAUC), no site da Secretaria do Tesouro Nacional (STN/MF)
, no site da Secretaria do Tesouro Nacional (STN/MF)")
35
Obrigada por sua companhia!

Apresentações semelhantes